I purchased this on a whim to try and replace the pebble I was using for heart rate monitoring. It’s probably one of the best purchases I’ve ever made.
Features:
Long battery life (about a week if you don’t record activities)
Always on screen
Can pair headphones to it
Garmin Pay (NFC payment)
Offline maps
All your normal running/riding activity recording stuff
Can use standard watch straps
Now here’s where things get interesting. The watch is usually synchronised with an app called Garmin Connect - a cloud based service. But before you write it off because cloud, let me explain a few things.
Garmin Connect basically has all the features you see in Strava, is more privacy focused, has a privacy policy that says it won’t sell your data, doesn’t push ads (there’s some promotion Disney watch achievements but its extremely minor), is free. Garmin Connect exists as a service to sell watches, not to sell a subscription.
Ok, so if there’s no subscription - the watches get no updates right? Well no. My fēnix received an update today, and there’s even been features released a year after its launch. The watches themselves are also fairly durable (except for the charging port / charging cables - that has room for improvement).
Remember how I said about the cloud? Well you don’t actually need to use their app. You can plug in the watch over USB and copy the FIT files directly from it. I guess the disadvantage here is that it can’t be done over Bluetooth.
Garmin watches seem like a breath of fresh air when it comes to devices with cloud integration. Sure there are some niggles, but gosh its so much different from everything else I own.
Shokz OpenSwim Pro bone conducting headphones
I weirdly put off bone conducting headphones for so long as I had a bad experience with trialling radio headsets that used bone conduction. Running Warehouse ran a Shokz try out day and within minutes of my run I entirely forgot I was wearing them. Towards the end of the run I brushed the back of my hair and nearly freaked out because I forgot I had the headset on. I purchased a set within a week.
The advantages of bone conducting headphones is that they don’t block out sound. So you can hear other people and the environment around you. Hugely important for safety. The other part is since they don’t go into your ear like earbuds but rather sit on top, you don’t get moisture build up in your ear. That had become a bit of a problem for me and I was constantly getting blocked ears.
I bought the swim model in the off chance I got swimming again. Swimming can be a bit tedious so having some tunes to boop to is good.
A bit of a warning though - these devices are very personal preference. The audio quality isn’t like what you’d get from normal headphones. Its probably a good idea to try one out first.
VR-N76 handheld radio with packet TNC
As soon as I saw the VR-N76 firmware update provided a KISS TNC interface I had to have one. Unlike the HG UV98 the the TNC actually works as proper TNC, not just APRS.
I was skeptical of using the app, however its been great. The APRS features seem to work well enough. What I’ve been enjoying is that you can listen and TX from your phone - which might initially seem like a silly feature, however what it lets me do is listen to music on the Shokz while also listening to the radio. The radio stays in a pocket in my bag, and if I want to TX I just key up using the app which uses the Bluetooth. The app also keeps a history of transmissions, so if you miss and important detail you can replay it to get the info you need.
I feel a little bad delaying this blog post for so long. A few other things got into the pipeline. The tl;dr is WSJT-X 2.7.0-rc7 is pretty fine. It uses TOTP now and third parties can run their own verification.
In previous posts we looked into the now discontinued SuperFox verification scheme. Since that post rc7 has been released. Many various solutions were proposed with various trade offs. Remember that we are dealing with dozens of bits here, not bytes. The final solution was chosen for its simplicity.
TOTP
One of our first suggestions when digging into alternatives was using a time based one time password (TOTP), similar to the H40WA dxpedition. TOTP works by both parties having a shared secret key. Both parties combine the time and the secret key, then hash the result. This allows verification without sharing the secret key or being able to replay an old message.
At this point you’ve probably spotted a problem however, both parties need the key. The way this is worked around, both with the H40WA system and the WSJT-X system is that the receiving station doesn’t hold the key. Instead a server holds the key and the client can request the final value from the server.
The important part that lets this work is that the server only return the TOTP values for already transmitted windows. A transmission using an old code won’t have the correct timestamp and the client won’t verify it.
Generally speaking WSJT-X stations have time set pretty well as transmission and reception only really works if clocks are within 1 second. If a client did have their time set in the past an attacker could use old codes, however in practice this is rare and the consequence is minimal.
WSJT-X actually uses the following request to perform checks
Side note here - The way WSJT-X handles data during a lot of the verification steps is passing through strings then checking if they contain certain substrings. I haven’t spotted a trivial way of doing due to the limited nature of an FT8 transmission (no lowercase, short freetext and no new lines) - but I wouldn’t be surprised if there is some fun to be had here. It might be possible to have the client process a crafted line with an old time.
WSJT-X have listened to feedback and allow running of SuperFox without verification keys. Not only that they do have configuration option to change the verification server. An example server might be something like:
Do note that you’ll need to be able to handle many amateur radio operators requesting tokens every 0 and 30 seconds.
It’s really good that the developers have listened to feedback. To recap:
Entirely open source
No secret sauce
Can be used without a third party
Can provide own verification service
I did quickly want to touch on some of the downsides of this approach. While the transmitting station doesn’t require an internet connection the receivers do. The server does allow checking of old logs so temporary internet outages can be patched over. I think this is a fair compromise and likely works for 99.9% of users. For the users it doesn’t work for - it just means waiting for a QSL card to confirm that it wasn’t a pirate.
Some other approaches used CSPRNG (Cryptographically secure pseudorandom number generator) stepped backwards. Occasionally the broadcasting station would transmit a signed message with the parameters for the CSPRNG which would allow verifying past messages. This was a pretty cool approach even if complicated.
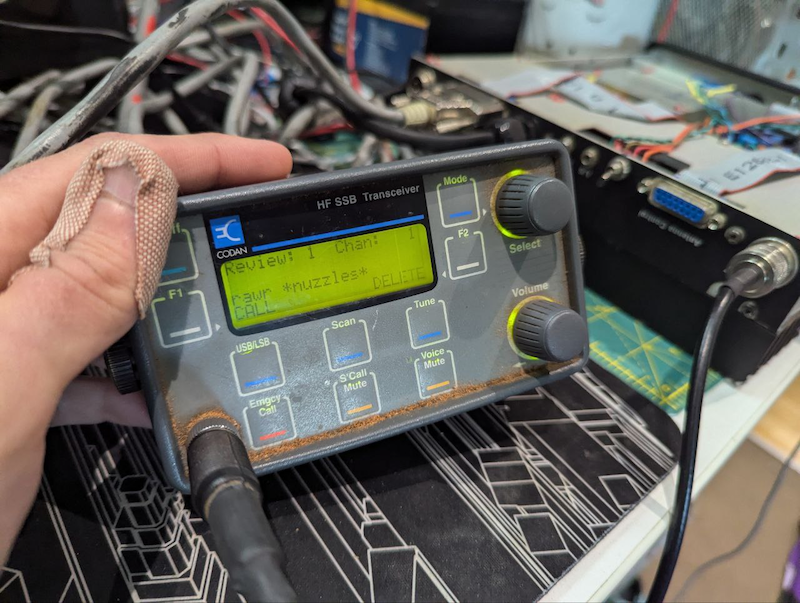
In part one I left you with a cliff hanger regarding page calls. And I particularly like this little note:
This shouldn’t be hard
Like it’s a radio from 1993. Easy right?
That was nearly 7 months ago. That being said I haven’t been working on that project full time and up until recently have only really just been chipping a way at it here and there. In the last few weeks I’ve been using the project as a bit of an escape. Since there’s so many facets to reverse engineering, different pathways and different things to discover the project has provided many simple tasks for me to work on that don’t require much capacity. I can just put some music on then label some functions, decompile code, run emulator tasks. Just poke random memory locations to see what they do.
On Sunday I was able to replicate the magic hashing function used in the page call protocol in Python, and hence why I can write Part 2!
What is page call and why is it different?
Page calls are text messages sent between radios. Essentially SMS for radios. Or I guess WhatsApp(?) messages for radios. The protocol is very similar to the selcall protocol, just with the message spliced in…. however…..
Codan decided that page calls should be locked down. My assumption here is that the 93xx series of radios were the first by Codan to be advanced enough to allow paging and to keep a market edge they wanted to make it harder for competitors to provide interoperability (pretty sad imho). So page calls include two extra bytes that are validated before receiving.
Freeselcall up until now has only been able to receive messages. Messages sent would not be received by radios using the magic bytes.
Surely someones worked it out?
I’m not sure if anyone actually has. I can’t imagine I’m the first but I can’t really find any resources online about these two bytes. I found one groups.io post about someone asking about it - but no responses (shame I can’t find that post anymore! I’d love to respond! I found the post!)
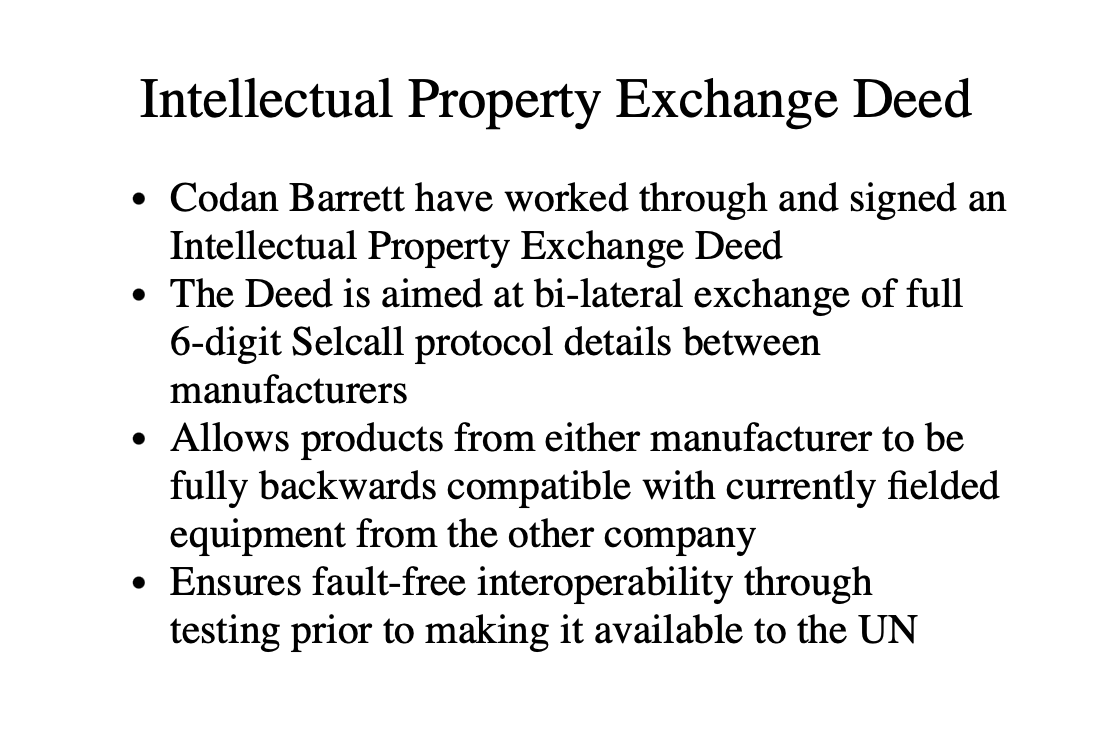
But doesn’t Barrett radio support sending pages? Well some more modern radios do, except they somewhat side stepped the problem by working with Codan.
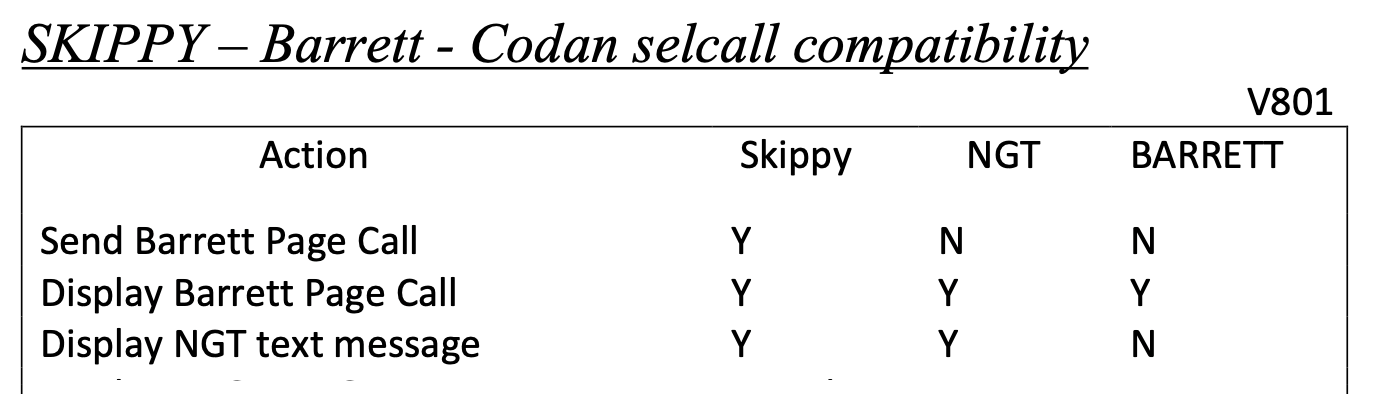
What about Skippy? Well it claims it can send page calls but if you look at the details it can only send them to other Skippy users - likely because of these two bytes not being known. I’d love to know if Skippy to Freeselcall worked.
And to be honest, I’m not all that surprised. There’s not a lot of demand of sending messages like this. There’s limited users and the people who do need this functionality will just pay for the radio.
But these two bytes were like holding a red flag to bull for me. I needed to know.
The basics
Apart from doing prior research and asking ex-Codan employees I checked a few things. How do the bytes change when I change the selcall id by 1. What happens when I change it by 1000. What happens if I change the message. What happens if I flip the to and from address.
This data quickly builds up test cases. Lets you validate assumptions. I only ended up with a few of these tests though as it requires a lot of tedious work to do, along with waiting for transmission. But I had enough to rule out basic single XOR or just swapping parts of bytes. It was certainly cascading in some way since changing one bit change a lot. It also told me that since the bytes didn’t change with the message that the bytes weren’t used for confirmation or recovery. Purely as a security check.
Effort to not touch our radio
Even though the radio was designed in 1993, the Codan 9323 is still a 100W HF radio. And a good one. This means they still sell for $400+ on eBay. Buying a replacement one would be annoying and expensive.
I wanted to minimise fucking around and finding out on our radio. No pulling eeproms, no tapping into the memory bus.
Luckily there are dumps of the firmware online now. Bless these people. This allows us to look at just the software side of things. Likewise there’s a bunch of service manuals, PCB and circuit diagrams for many of the units allowing us to paint a picture of how the system works.
At this point I blindly fired up Ghidra and pretended I knew what I was doing. Then I spent about 3 hours reverse engineering a supposed crypto function that turned out to be 16bit long division.
Update
In between writing the first draft of this post and today, I managed to find a bug where a malformed pagecall packet caused our radio to hang and on reboot crash / act odd. I was luckily able to fix this. After trying so hard to ensure I didn’t break out radio that was an extremely close call.
Maybe we should emulate it?
At its core it’s an 8051. Surely there are a ton of of 8051 emulators. I could just dump the ROM into one and go.
Well, that’s partly true. There are a ton of 8051 emulators, however it’s not just the CPU that needs emulating, its all the supporting hardware around it. So out come the schematics, service manuals and we begin collecting datasheets for all the random ICs scattered on the board.
Then you realise that the ROM is 128k, and an 8051 can only support 64k. How does that work? The magic of bank switching. The code will use additional pins to switch in and out banks of memory. The code has to support this and know what its doing. Since this is done in software the emulator needs to support this as well, and everyone does this differently so there isn’t a standard way to emulate the bank switching.
So I ended up starting with py8051, which is a python wrapper for emu8051. I really enjoyed working in Python for this project. I didn’t need speed - just something I could quickly modify to get the job done.
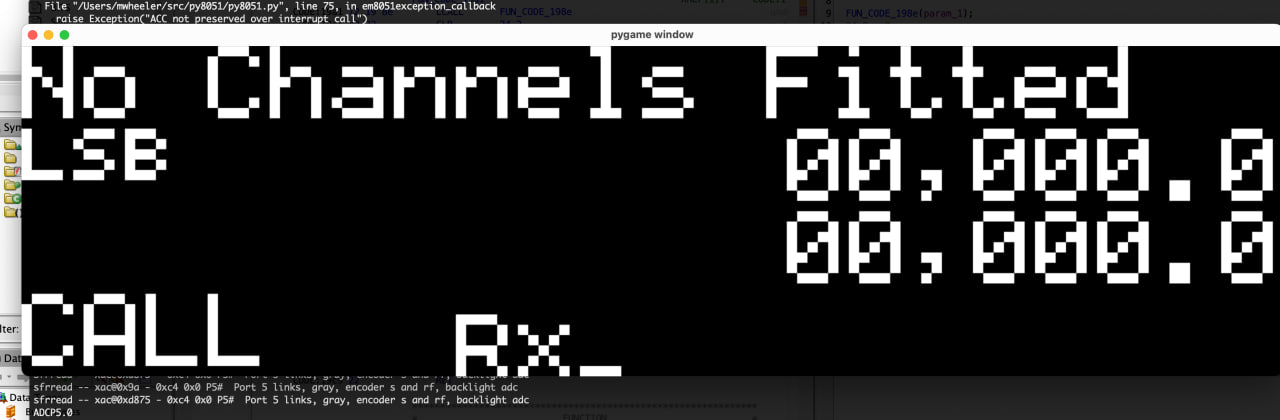
The emulator was super handy in understanding what code was, what functions were doing and allowed me to continue reverse engineering in Ghidra. Eventually the emulator progressed so far in hardware emulation that I was able to get the boot screen to display on a virtual display, and with some memory poking I could even just some of the normal displays to show up.
I never got the emulator(s) to a point where they would run normally though.
Emulators? With an s?
Yes. Many of you probably already gathered but our Codan 9323 radio has two parts, a remote head and a base. (Other units are sold with a front panel on the base, however this is effectively the head unit packed inside the base - other fun fact I found out is that you can have multiple head units connected!)
So this poses the question - does the magic get calculated on the base or the head unit.
Surely the base unit since the head would just be a dumb interface right?
Except you can set a privacy code on the head unit
Except maybe it just sends that back to the base unit
But maybe the base unit a dumb device
But you can also send a page call from the serial port?
Maybe the base unit just asks the head unit to encode the packet?
I continued chipping away at both. When I got stuck with one unit and I switched to the other. Was this the fastest way to work. No. Certainly not. But its what I could fit in to random spare gaps in time and days where I didn’t really want to go out to play.
Maybe I should just check?
At this point I had emulated both the bit banged I2C and the hardware based I2C… hold up… hardware based I2C?
Oh yeah this is not a standard 8051, It’s a Philips 80C552. This means there’s a bunch of extra functionality, which is more logic to handle in the emulator sigh.
Anyway, at this point I had emulated all the I2C. Not to the point that the two emulators could talk to each other, but enough for me to send packets by hand and see what happens. Reverse engineering the code gave me an idea of what the packets looked like, but not enough to get anything to work.
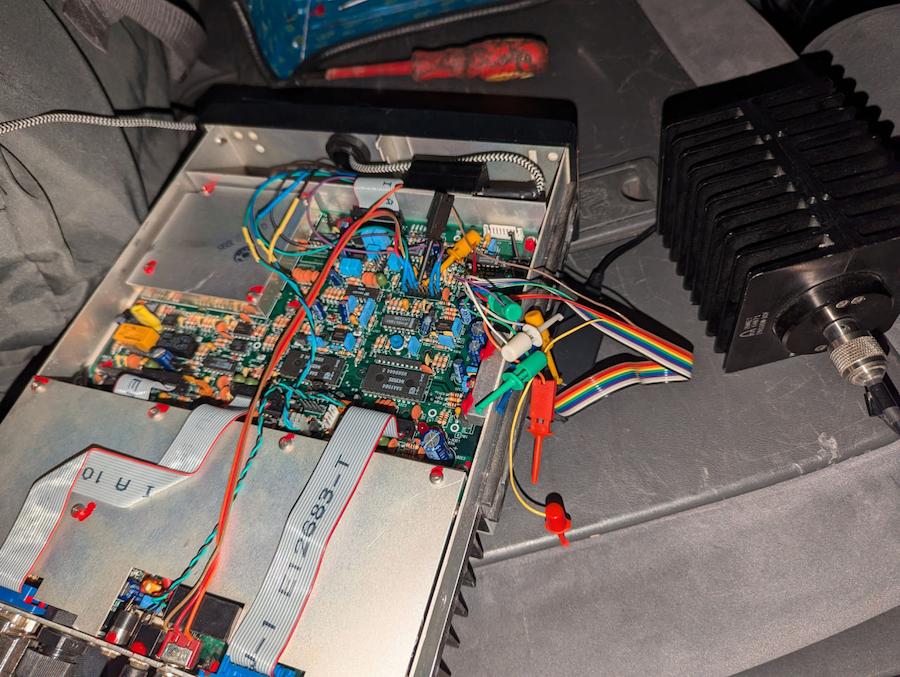
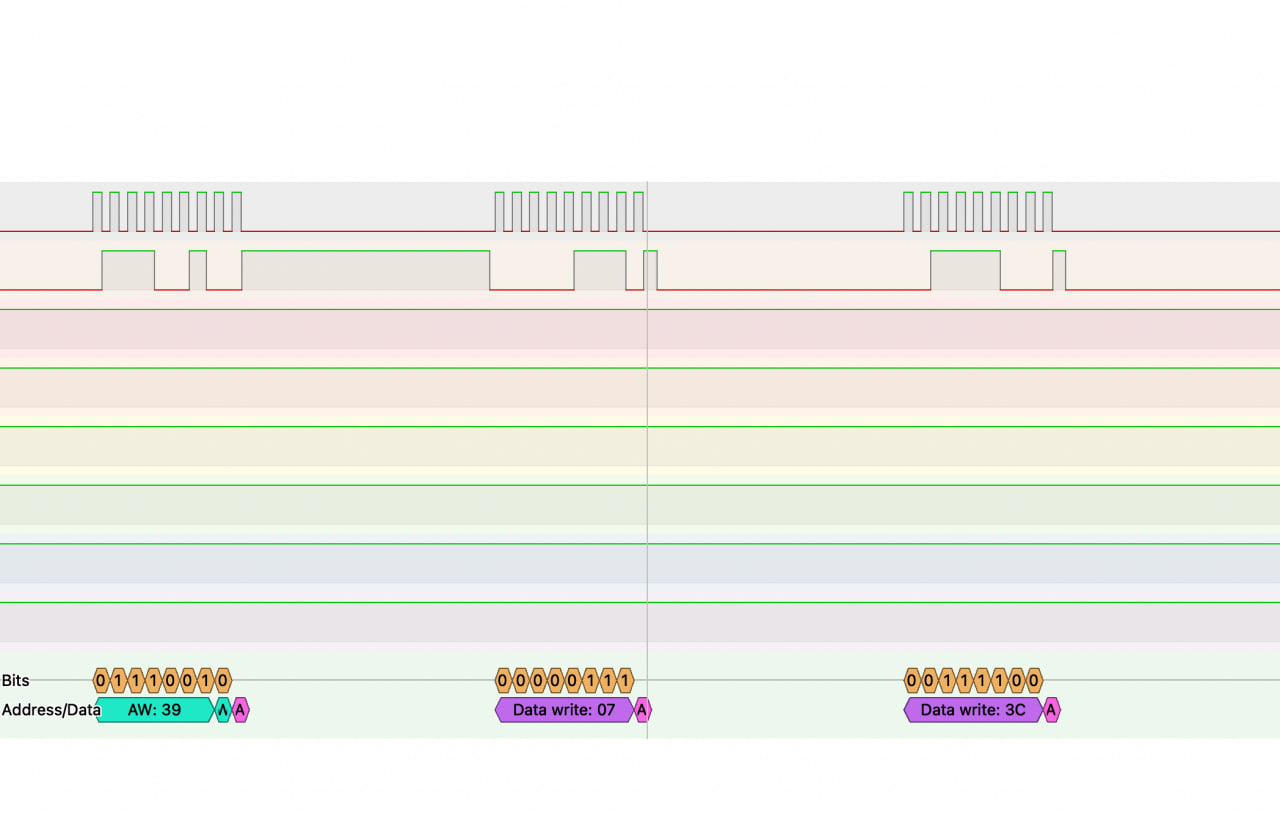
Eventually I gave in and decided on a safe way to capture the I2C data between the head unit and the base unit. The front panel connector that wasn’t used on our 9323 was perfect for tapping into the I2C between head and base unit.
These packet captures done with PulseView were super useful. I could replay the messages in the emulator and see the results. It also revealed very quickly that the me magic bytes were not sent from the head unit to the base unit when sending a page.
My effort focused again on reverse engineering the base unit. But more importantly building out the emulator for the base to a point that I could the page call I2C messages.
With some bugs fixed in the emulator I finally had the emulated base station processing the page call messages. It even tried to transmit them - however I hadn’t emulated the tone generator….
It didn’t matter though because the important part was that it generated the bitstream for the transmission including the secret bytes.
At this point we have some options
Ship a 8051 emulator and a copy of the 9323 base station firmware in Freeselcall
Pre-calculate all possible value pairs (this is actually pretty possible, and not tooooo big of a lookup table)
Work out the algorithm
The algorithm
I took two approaches. Looking what happens to the emulator step by step, along with labelling and correcting Ghidra decompilation. Some parts I could only work out by watching the emulator. Eventually I came up with a solution that worked for 3 test cases. But failed on the next one - some tweaking and testing and all the test cases that I have recorded now work.
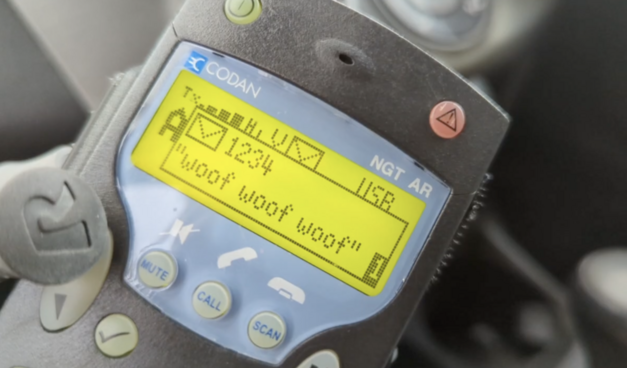
I then hastily set up freeselcall to use the new code and sent a test transmission from the IC7100 to the Codan 9323 and it worked! I then spent about 20 minutes reading the users manual to figure out how to actually open a page call (turns out you need the microphone, then press the recall button then call button). I found it hilarious that I knew how to generate the magic bytes but not know how to open the message on radio itself.
I generated a test file for Mark to transmit and it worked on their NGT radio!
Update It’s been been tested against a Codan Envoy!
Fin
Where does this leave us on this epic journey.
By the time you are reading this, freeselcall should be released on GitHub (and maybe pypy) with support for pagecalls - if not it will be very soon I promise
I specifically haven’t implemented privacy codes or 6 digit pagecalls. I have no use for these. It’s not hard work - but it is work. If someone makes a PR and tests for it I will support it.
I now know far too much 8051 assembly and Philips 8051 I2C information than I ever wanted to know
I have a copy of all the random IC datasheets now
The emulators won’t be released publicly nor the Ghidra annotated project
6 months ago I tagged a series of functions as likely to be related to the pagecall magic - I was right, but I didn’t have a way of working out the inputs/outputs without the emulator
Side quests
Like all good projects there are side quests. I won’t document them here, but to give you a taste of where things lead to:
Found 3 different 8051 emulation quirks/bugs where my CPU didn’t match the emulators view of the world - these were annoying to troubleshoot. One of which was even present in the commerical Keil 8051 emulator
There is a 1-wire IC - DS2401 - that is packaged to look identical to a through hole transistor. It stores the serial number of the unit. I feel like the packaging is specifically to hide where the serial number is so people can’t reprogram / change them? I read ours by sniffing the 1 wire data pin on boot