Unless you actively work across all layers of Australia’s national electricity market (NEM) there’s a high likelihood that this blog post will make you less confident in understanding the dynamics of the NEM.
I’ve worked at a aluminum smelter (one of the biggest energy loads you can find on the grid), a energy distributor and a power station. My first introduction was an aluminum smelter. The smelter wanted to change its load based on the spot power price. This dabbling in the NEM lead me to investigating the NEM’s open data and I eventually setup a website to visualise it. For a long time it was one of the only free and accessible ways of seeing the spot price, generation / demand and station generation. The websites long shutdown now. Often I had requests from people thinking I was from the AEMO/NEM which was concerning…
Even with this knowledge I still made bad assumptions and mistakes when talking about the NEM. From a high level it seems simple, you have loads and generators, people bid, you get a power price. There are soooooo many more variables to it than that though. It’s highly likely that I’ll still make mistakes in this post. Also the rules, requirements and the dynamics of the market change frequently.
Complication 1 - Interconnectors
The NEM currently has the following regions, VIC, QLD, NSW, TAS and SA. I say currently as the Snoy Hydro used to be its own region. Each Interconnector has its own limitations based on technology (AC, or HVDC).
It’s easy to simplify this as each region is its own market and the interconnectors are just generators and loads. This gets you so far. However where this starts to break down is that the interconnectors pass power through them, not cash. All going well power flows from low price region to high price region. However there’s a variety of factors that cause the fiscal model of the NEM not to match the actual model - for example data errors could cause the interconnector to fiscally run the opposite way to physically. This makes people sad.
Bonus complication
Interconnectors aren’t necessarily a single physical interconnector and could be made up of multiple connectors. This is called a notional interconnector. A directional interconnector is all the interconnectors flowing in a single direction to another region.
So you have to consider not just the limits of a single interconnector but all the interconnectors between the regions
Complication 2 - Regional losses
Lets make a simplified version of the NEM with a single generator and a single load. The load will be in Melbourne and the generator will be in Townsville. The loss in power from cabling will be significant.
The NEM “solves” this by using regional reference nodes and marginal loss factors to help calculate how much the power is worth.
Complication 3 - Grid constraints
Every piece of equipment has limits. The amount of current it can handle. How much can it handle at $x temperature. Best case when equipment hits its limit, it will trip, worse case it will be damaged.
Given the risk it’s important that these are modelled so that the grid can’t put a single piece of equipment at risk of hitting these limits.
What does this mean? Well even if we have plenty of generation, if its in the wrong place or other equipment is fault AEMO might need to request changes to ensure power system security, which includes things like voltage and frequency.
Check Out Constraints
The AEMO publish a constraint library to check out.. Might take awhile to get through. (Correction, the link provided here is for the WEM however it gives you an idea of the types of constraints and how many there can be)
Complication 4 - FCAS
Frequency Control Ancillary Services. FCAS. A very important part of keeping the grid at 50hz. This is an extra set of rules that are followed to bring the grid back to 50hz. More recently it was discovered that we needed even faster recovery from faults. So we also have Very Fast FCAS.
Bonus complication
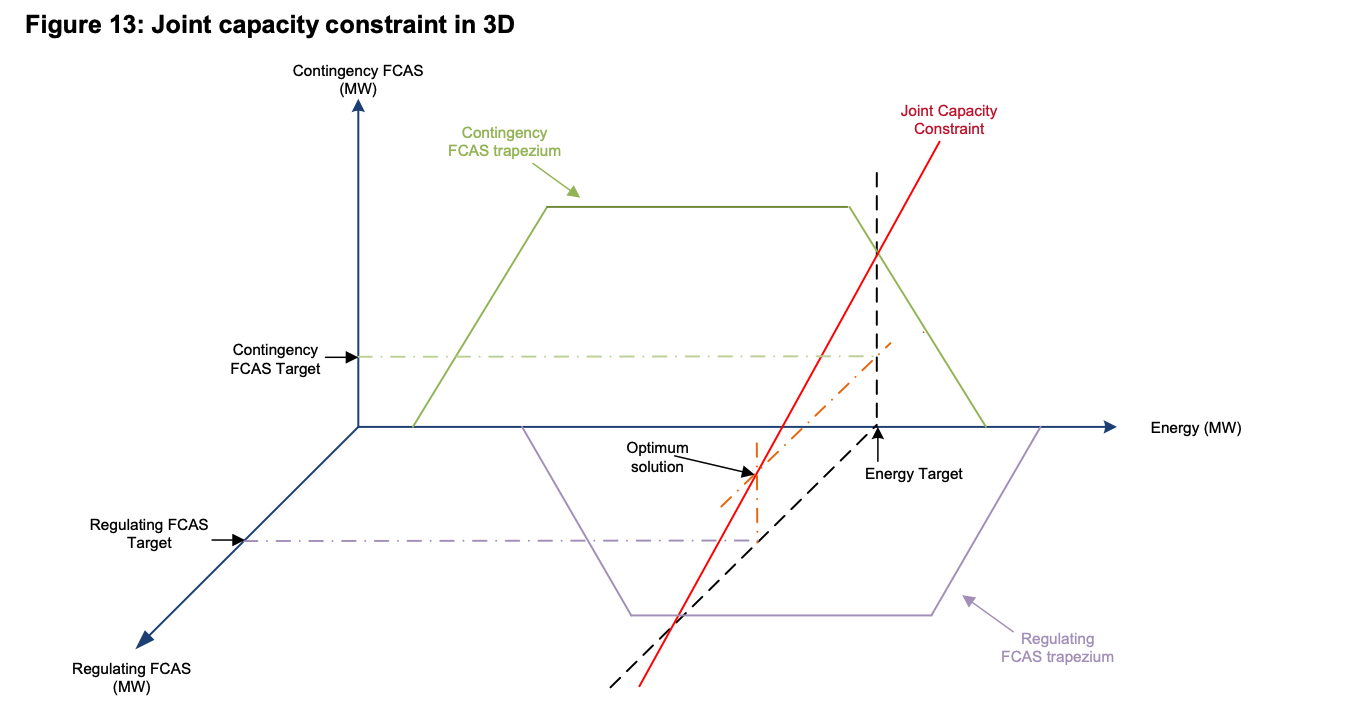
Understanding AEMOs 3d FCAS trapezoid
(it’s actually not as bad as it looks at first glance…. but still)
Complication 5 - RERT
Reliability and Emergency Reserve Trader. This is effectively AEMO having their own contracts with companies to provide generation or load reduction for when the market isn’t able to respond.
Complication 6 - Time scales
So I haven’t talked about much about bidding. Bidding happens every 5 minutes. So we have Very Fast FCAS and FCAS that happens in seconds to a minute, the spot price at every 5 minutes, RERT that happens at much longer. Forecasting also happens at different time scales. At any one time there are lot of different processes happening to determine who pays what and how much.
When the sum of the price intervals equals a fixed amount administered pricing kicks in. This is a damage control system to prevent the spot price from bankrupting everyone.
Complication 9 - Outages are complex
A single unplanned outage can enforce a whole bunch of new constraints and limits. Suddenly the model has to reconfigure itself and make the network safe by imposing the correct constraints. Often outages are multi-faceted - eg a storm impacting multiple transmission lines, generators and loads. Or an under frequency / over current event could cause generators to tripped in parallel unexpectedly. You might lose six units at a powerstation due to a workers strike.
Complication - Closing….
The NEM is complex. I’ve only just scratched the surface here. Like the very very very surface. If you want to learn more much of the NEM is documented by AEMO and publish online. WattClarity also have very good learning resources and explain interesting events.
During unrelated research I came across SNOCOM. Apparently Australia’s first transistor based computer which was used for the Snowy Hydro project in the 1960’s. I became a little obsessed with it. It’s a fascinating piece of Australian computing history. Given its age it would be amazing to read the computer programs and even run them. My brain suddenly latched onto the idea of building a SNOCOM emulator.
Unfortunately the project just isn’t going to happen. I’d really like to work on something like this but time and money constraints means I have to let this one go. I’m hoping in writing this post someone else has the opportunity to give it a go though.
SNOCOM was made by PhD student David Wong at Sydney University. The design was to be a general purpose computer faster and more flexible than ADA. David adapted the design of LGP and ADA to make a transistor based machine. It uses a magnetic drum for memory for about 8KB of RAM.
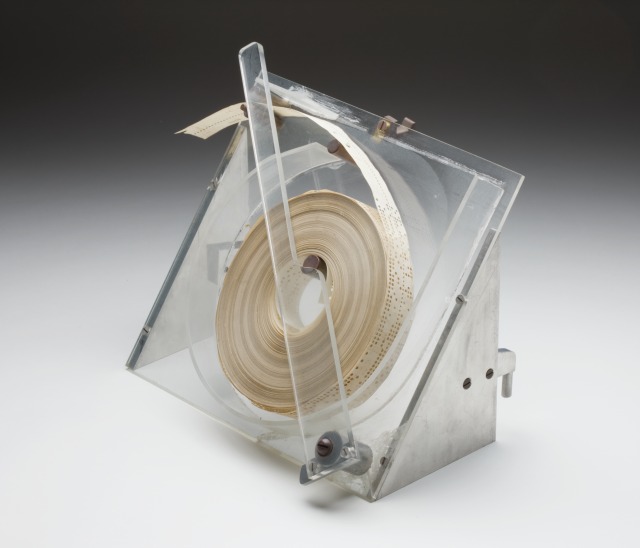
The NMA contains a lot of SNOCOM artefacts including journals, books, and punch tape! The problem is the artefacts aren’t indexed very well, and the NMA doesn’t seem to really have the skills to handle computing related history. This means that while they can photograph the artefacts obtaining the contents of the punch tape will likely be very hard.
I’m sure it will be possible but it’ll require finding the right people and process. It’s also likely that the programs are also written down in one of the books, however I can’t determine which books it would be in. NMA have sent me some low res photos of some of the artefacts and I haven’t been able to determine which ones would be best to request photographing.
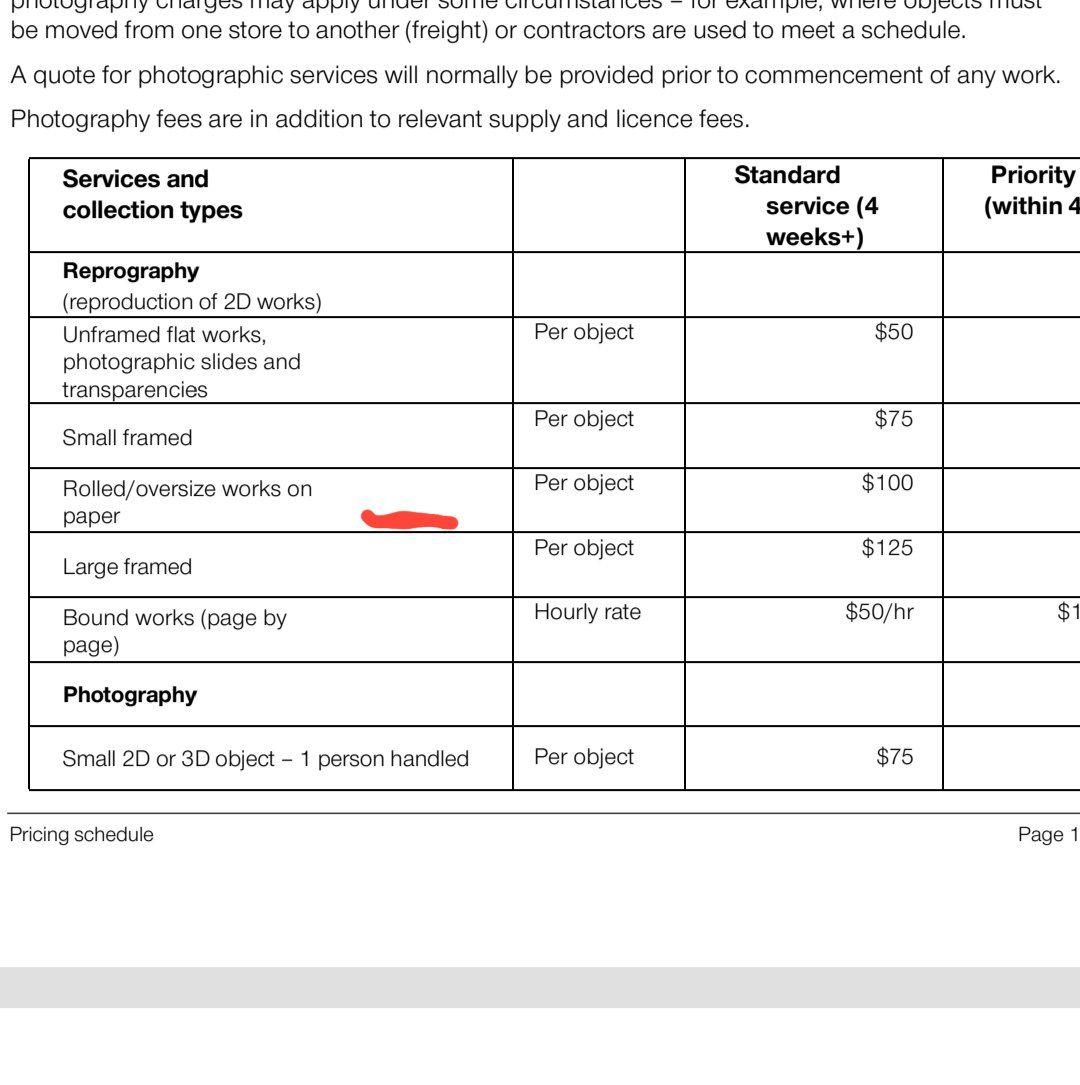
I could ask them to photograph or digitise them however the cost becomes very expensive very quickly. I could view the artefacts however I would need to get to Canberra. Even then its unlikely I could flip through pages. Just look at the covers.
Even if I was to magically gain access to the paper punch tape, I don’t have any equipment to read it. Photographing it might be an option, but processing it would be painful. One of the pictured punch tapes is ripped as well.
Then if the punch tape is processed, what program is it, whats its inputs and outputs. Is there enough information to make that tape useful?
As such I just can’t dedicate myself to a project like this. But maybe you or someone you know can?
If your interested here are some useful resources:
NAA has several pictures of the configuration sheets
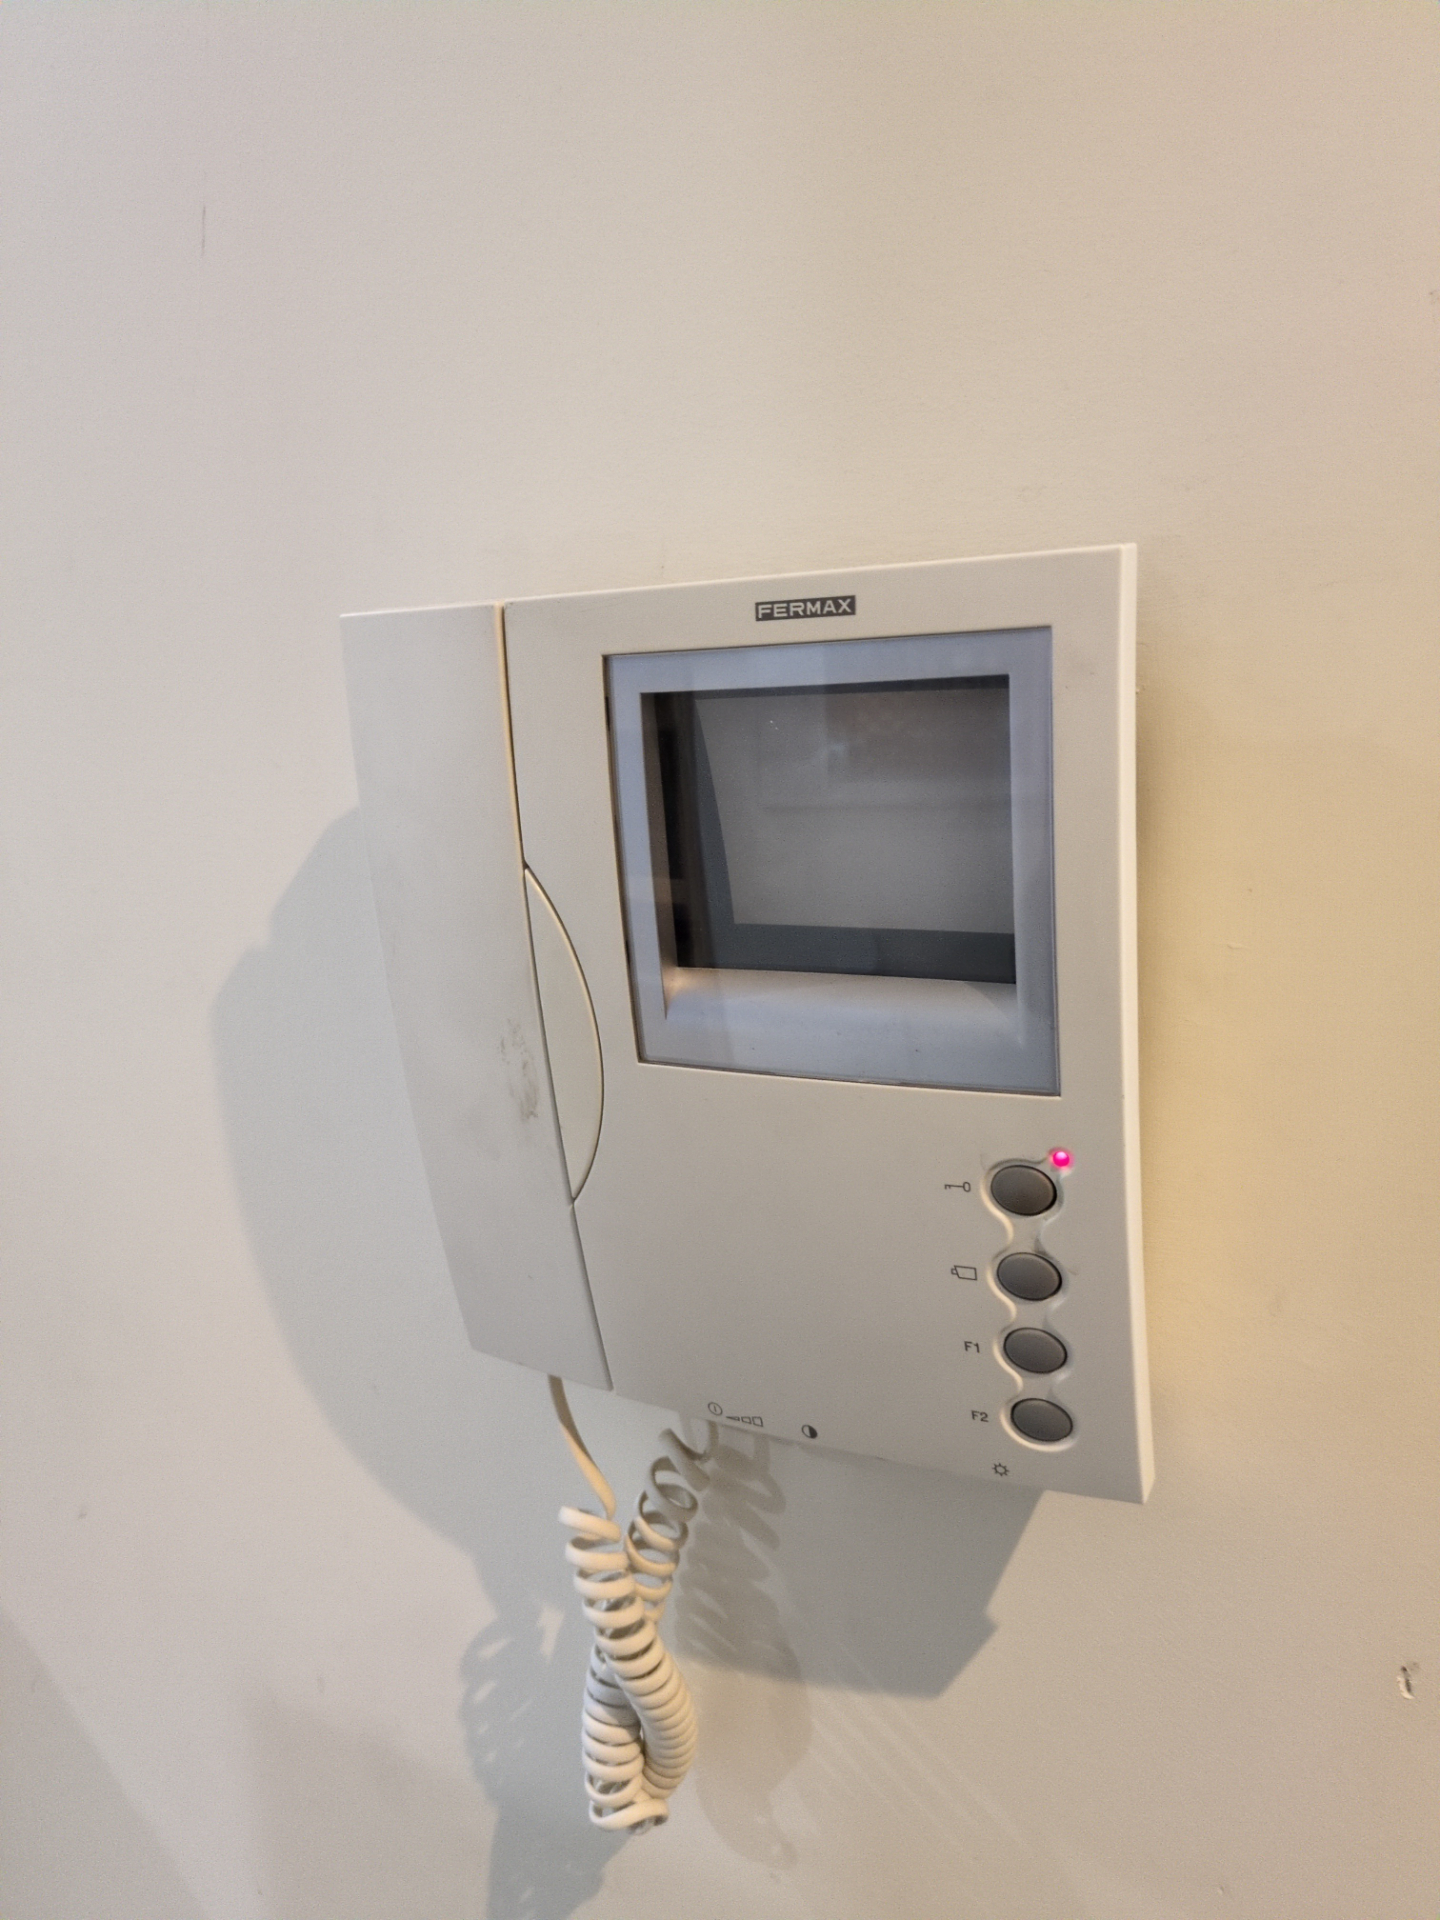
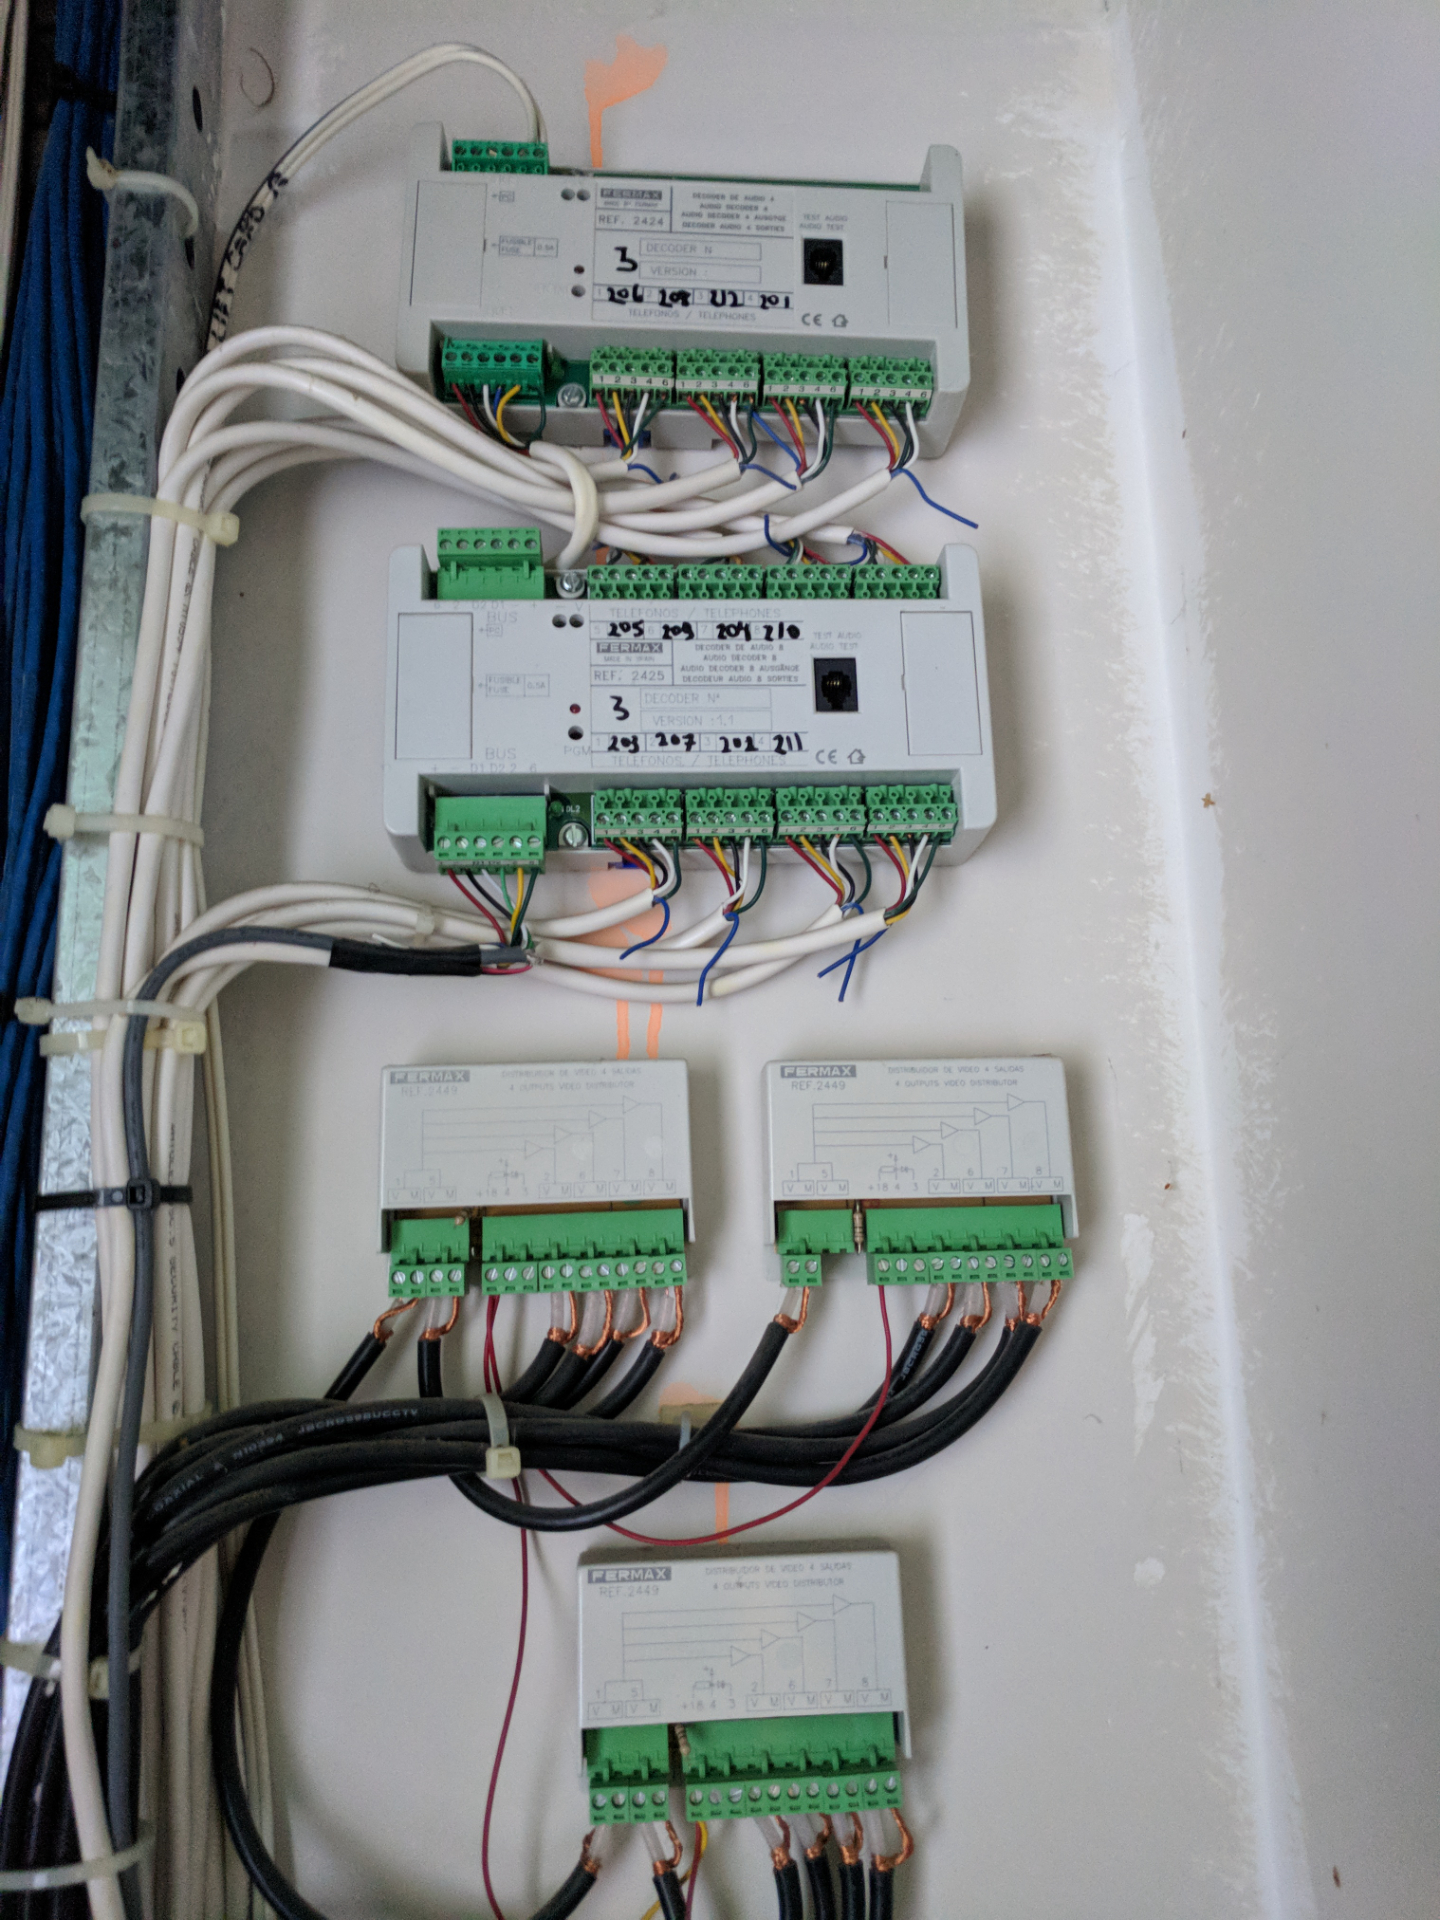
The intercom. Now days it’s a taken for granted necessity of apartment infrastructure. Ours is a Fermax unit with a maze of wiring interconnecting 4 unique buildings, several access panels and cameras. And while it works1 it lacks some modern day functionality. Currently it rings and unlocks doors from a central apartment intercom phone. That’s it.
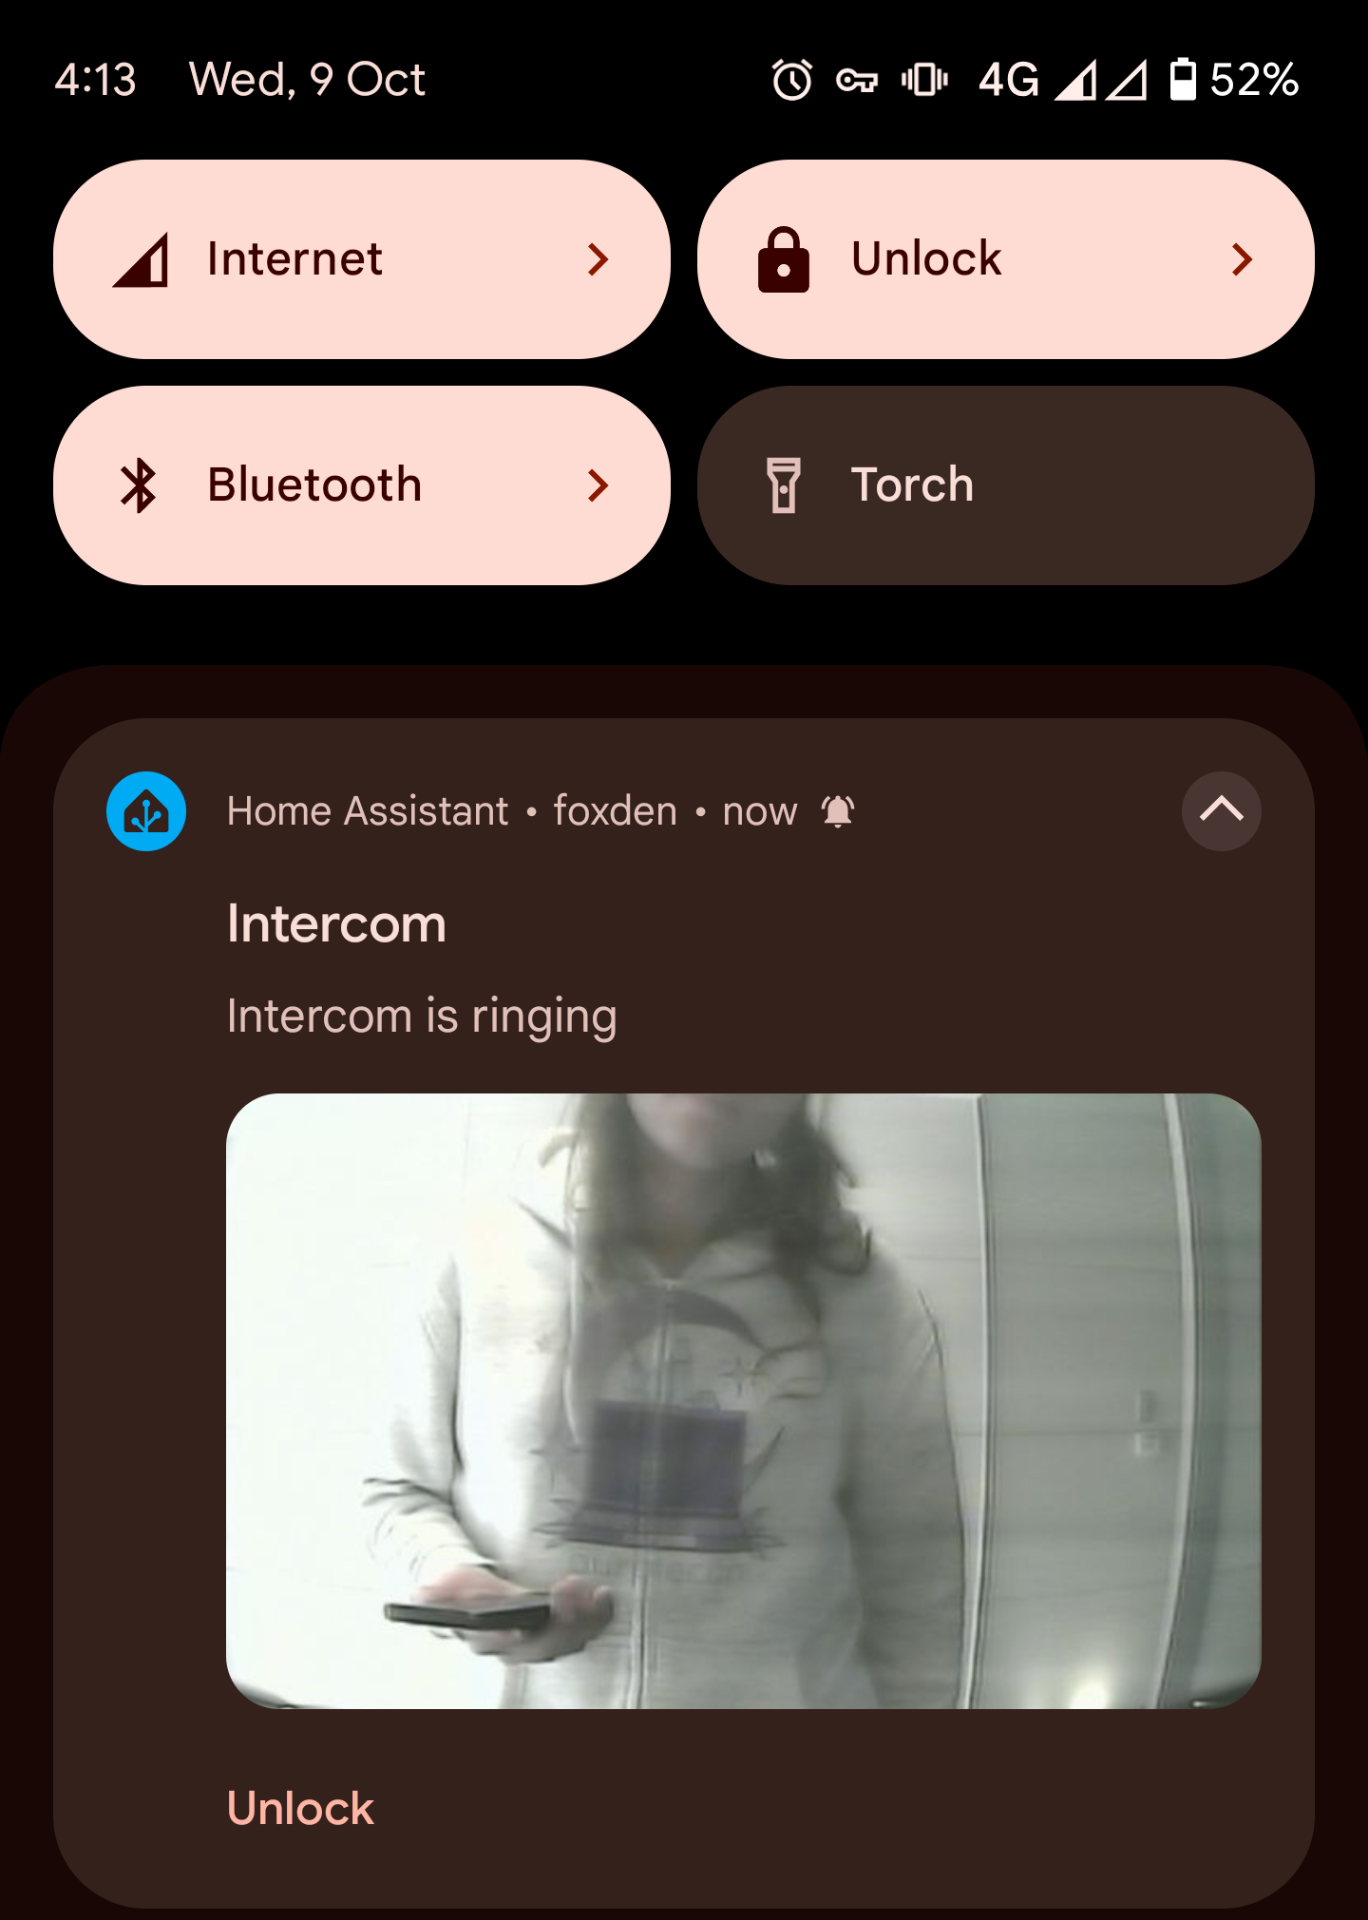
However being someone who loves to work hard to be lazy I wanted it to be just a tiny little bit smarter. Ideally we would allow remote notifications and remote unlock. I’d also like to be able to trigger opening certain doors without needing an active call, however as I’ll get into this isn’t possible.
Once again starting with the premise “how hard could it be?” I set out to bring these features to our intercom system. As always, there’s constraints. No breaking the existing intercom system (aka other peoples intercoms) and no breaking our existing intercom phone.
We’ve actually had partial remote control for some time. We opened up the intercom phone and added a relay in parallel for the unlock button. We also added a USB composite capture card
to a Pi to stream the video feed. What we learned from this is our intercom system uses a system called Fermax VDS which amplifies the video signal to all apartments. You receive the video regardless of which apartment was called! It’s also in colour, which we didn’t know before since our existing Fermax phone uses a black and white CRT.
Fermax sells a unit which connects a VDS system to wifi : Wi-Box. Great - I have VDS system, but I don’t want to use their cloud service. Luckily some people have patched some functionality and rooted the box. I purchased one, patched it, along with doing a little reverse engineering along the way for fun.
Then I went to wire it in and I suddenly realised my mistake. VDS is one of Fermax’s ways of performing video distribution. VDS can be used with multiple types of audio/intercom solutions like MDS and 4+N. The Wi-Box is designed for MDS system and while it says it supports 4+N, it requires an additional N+4 to MDS converter box - $$$. We had 4+N. This is when I started going down a research sink hole of understanding far too much about the inner workings of many of the Fermax systems and their respective interoperability.
So what the heck 4+N. It’s a wiring/protocol that allows keeping the intercom phones super simple. There are 4 common (as in common to all apartments) wires and then 1 wire per apartment. A total of 5 wires per apartment + the video signal.
Number
Purpose (simplified)
1
Door / Microphone
2
Microphone
3
Common
4 / Call
Ring (AC)
6
Speaker
4+N is really dumb. There’s no commands or fancy signalling. This means we can’t send a command like “unlock this specific door”. Additionally our apartment system uses Fermax privacy modules which disconnects the “common” wires when the apartment isn’t being actively called.
So what options are there for us to interface with this thing?
So the ESPBell-LITE looked pretty appealing to me, especially with its optocoupler system. And writing this now I can’t remember why I didn’t go with this option… Maybe it was out of stock? Maybe it was because I wanted cabled ethernet? Maybe I found this after?
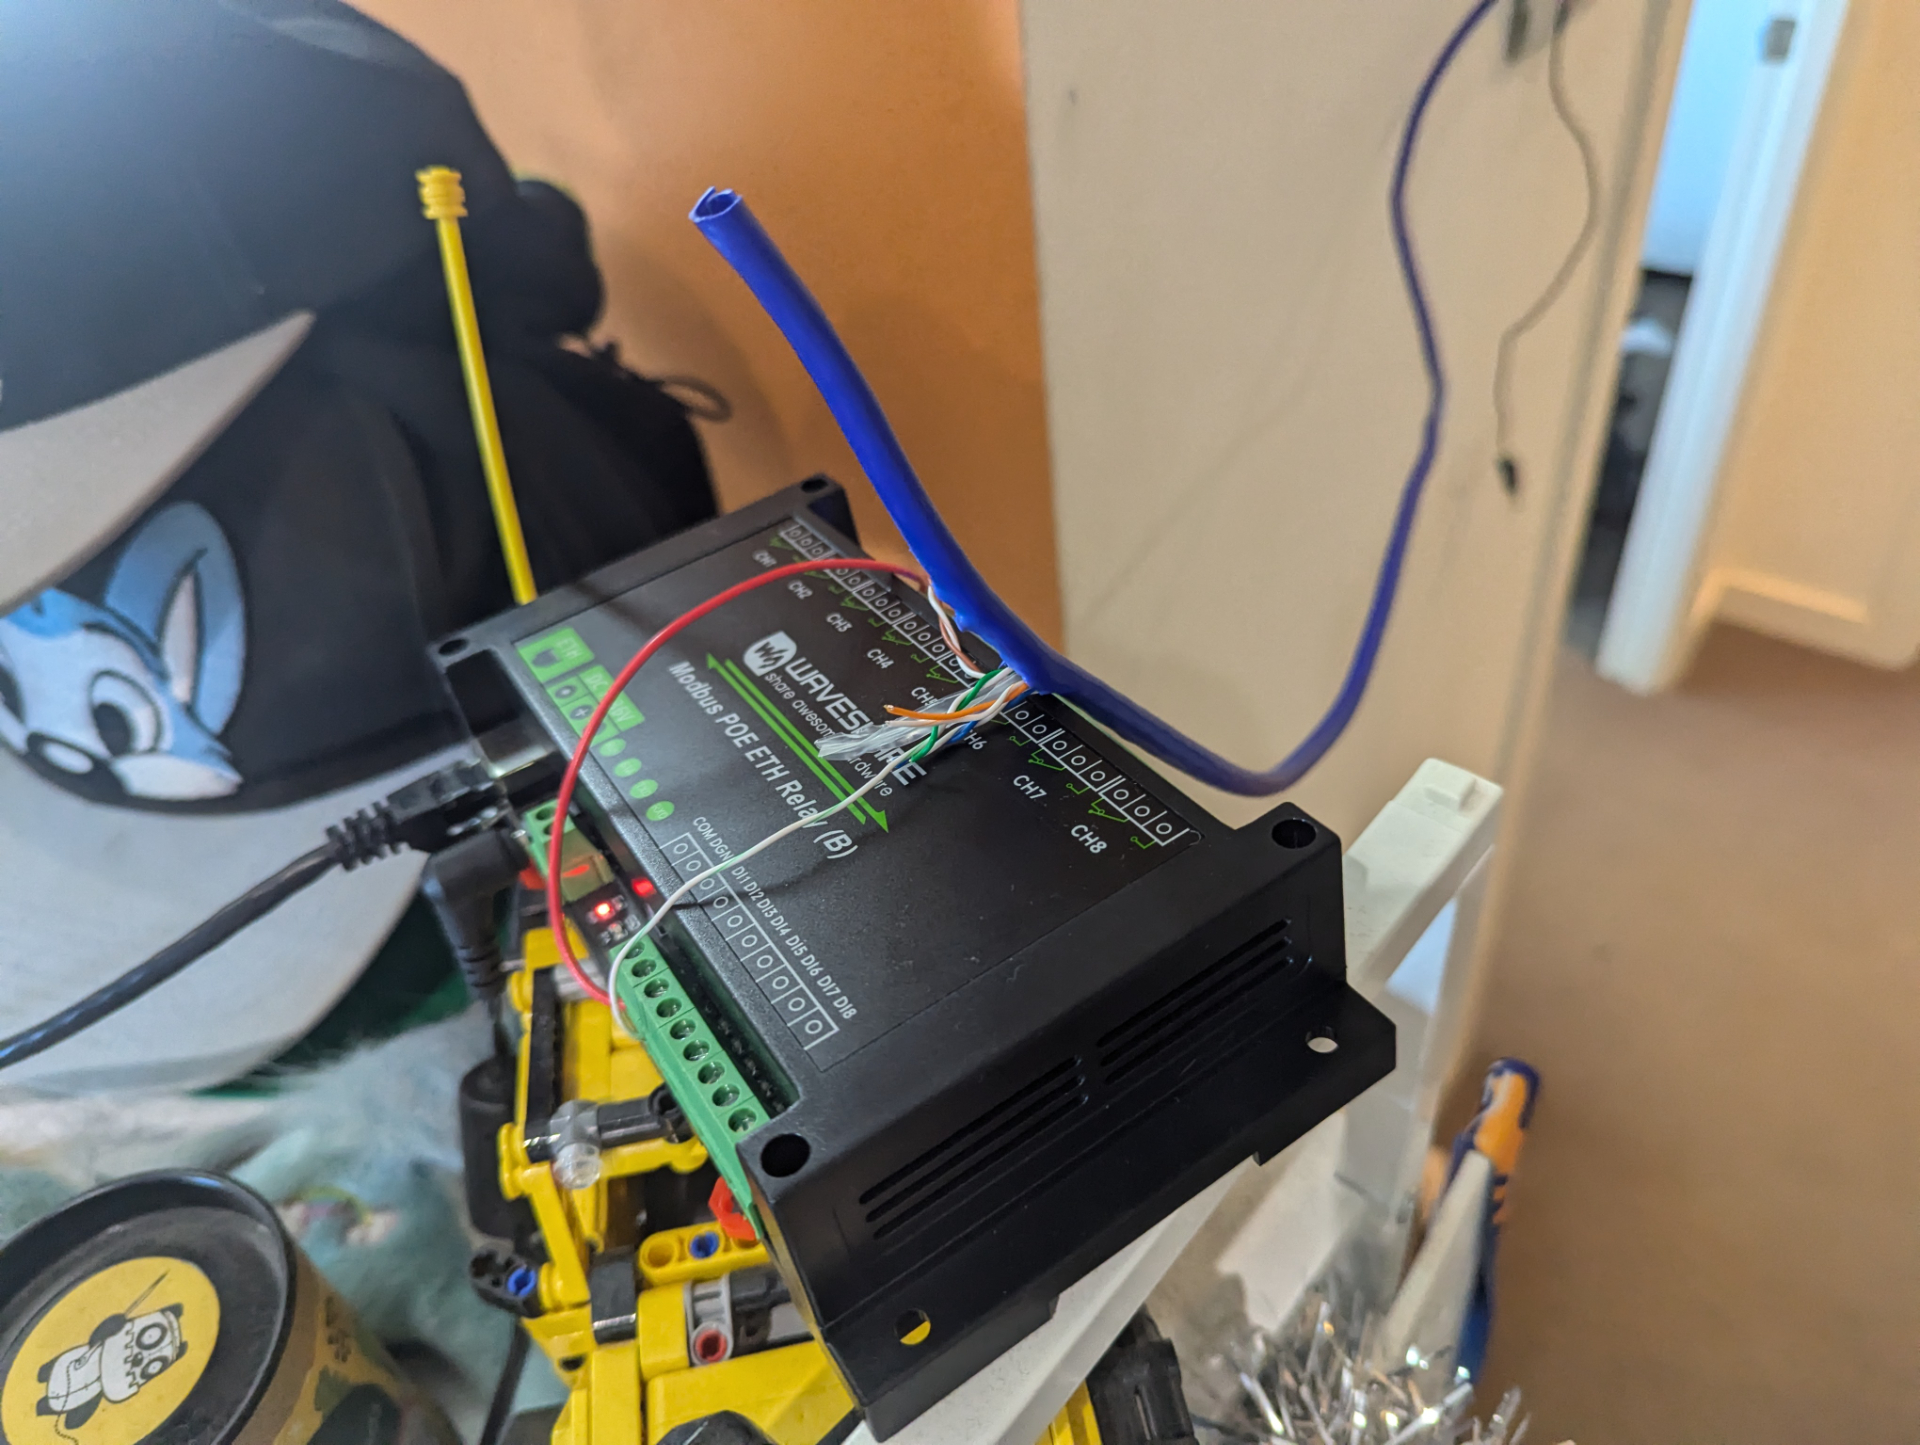
What I ended up getting was a Waveshare 8-ch Ethernet Relay Module (B). This is a ModBus to digital IO gateway. What makes it unique compared to most is that it contains optoisolated inputs that don’t share a common ground with the rest of the unit. I wanted to ensure that I wasn’t adding a new ground reference to the intercom system - hence relays and optoisolated inputs. Surprisingly a lot of units I saw with optoisolated inputs had the input grounds/commons tied together.
Fermax 4+N sends an AC signal on the 4 (ring) wire when a call is sent and shorts 1 (door unlock) to 3 (common) when the unlock button is pressed.
Annoyingly the ModBus protocol requires Home Assistant to constantly poll for the intercom to be ringing which can add a little latency on a call - but I think its acceptable. The other annoying thing is that the Waveshare supports “flashing” a relay - this would be useful for triggering the unlock command. However its implemented in a non ModBus compliant manner so isn’t accessible to us. Instead we have to tell HomeAssistant to perform the “flashing” function instead. As a safety feature I also have a automation to check the relay state and reset it if its on for too long.
As I mentioned we also have VDS video feed through a USB capture card. We use a Pi with ustreamer for this:
One thing I haven’t implemented is any sort of audio support. The thing is - audio kind of doesn’t work well on our intercom anyway, and very rarely do we actually need to talk to guests coming in. All in all I’m pretty happy to where we got to with this solution.
The system as a whole is on its last legs. Memory corruption is occurring on many of the panels displays and the audio has a significant buzz to it (I suspect this is crosstalk from a fire system which is abusing the copper network). ↩︎
DGND and COM are different on the Waveshare. DGND is shared with the rest of the Waveshare ground, while COM is floating. ↩︎