This post is going to be unapologetically weird. No one is forcing you to read this.
I don’t think there’s enough proper dummy spits1 in cycling. After a lot of thinking about this I think I know why. Cyclists love data.
Many cyclist have a cycling computer giving them data like:
Speed
Lap time
Gradient
Temperature
FTP
Then there are the additional sensors:
Heart rate
Cadence
Wheel speed
Power
Left/right balance
HRV
What does this have to do with a dummy? Well up until recently there wasn’t any way to record smart pacifier data for sports activities. In fact there wasn’t even a smart pacifier. Who’s going to ride a bike while sucking on a pacifier if it can’t give you any juicy data and stats.
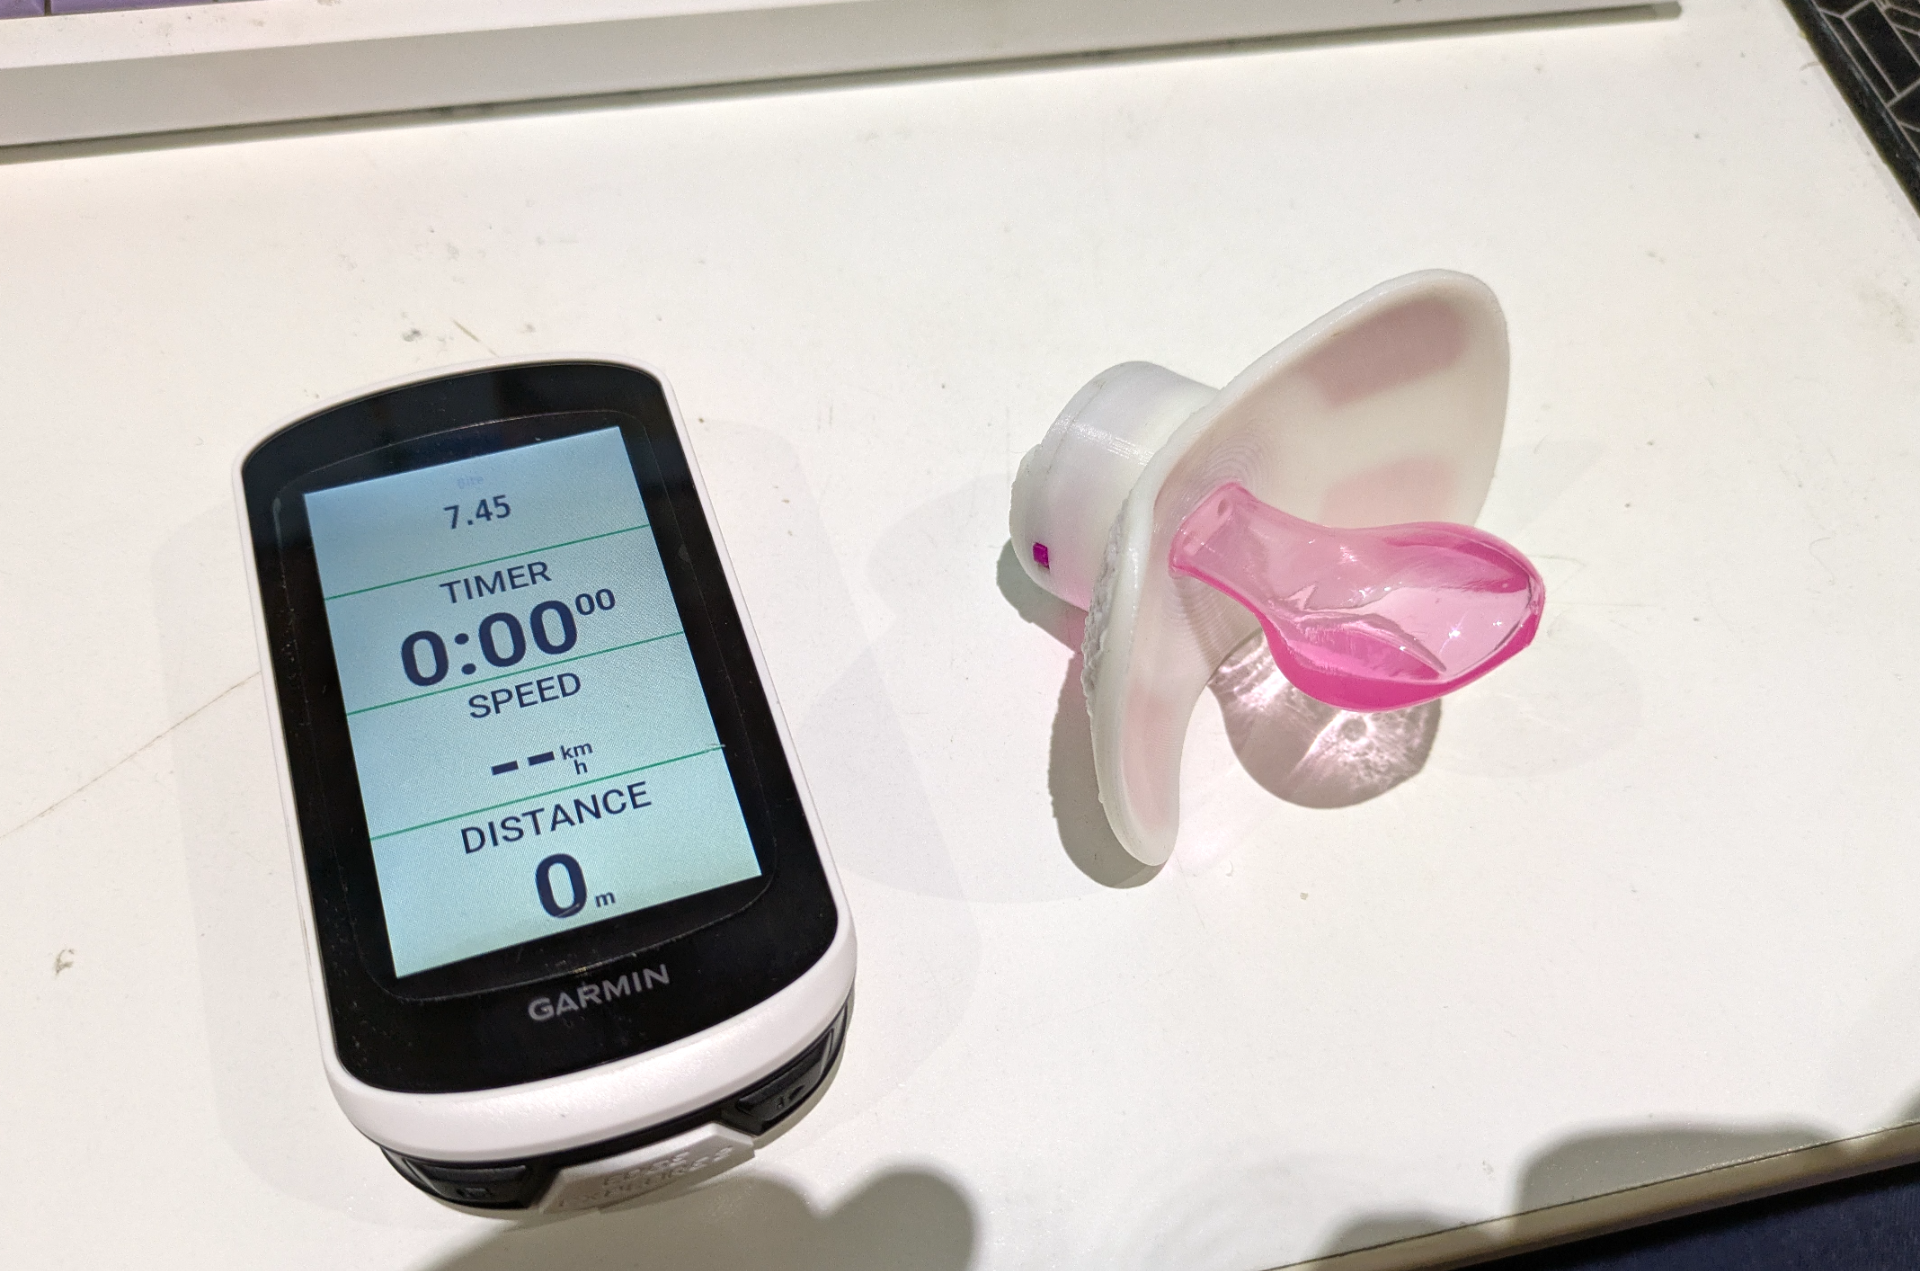
I was extremely excited and very privileged to receive a prototype Smart Paci from Curious Inventions. The device can monitor bite strength along with 4 capacitative touch sensors on the sides and reports over Bluetooth low energy.
You have a crank power meter, I have a smart paci. We are not the same.
The Smart Paci provides us with an opportunity to bring genuine dummy spits into the world of sports, but alas cycling computers and sports trackers have no native support to this new sensor.
Luckily Garmin Connect provides support for 3rd party apps and integrations through it’s IQ SDK. IQ apps are coded in “Monkey C”, which is weird….(I did warn you).
For example:
ByteArray objects are fixed size, numerically indexed, single dimensional, and take Numbers with a value >= -128 and <= 255 as members.
One of my frustrations with Monkey C / IQ SDK is that you have to do a lot of the heavy lifting. For example sending BLE messages, you need to implement your own queuing system. This is especially annoying when it comes to layout. You’d think that if I have a sensor value there would be something generic I could extend to make my data field look identical to every other - but it seems not. If you want to make a chart that looks like the Garmin ones? I think you’re on your own. Then you have to test the layouts on all the devices…
All this is to say, I’ve made (well hacked together - it’s not my proudest code) a Garmin Connect IQ data field for the Smart Paci. The field itself is very basic, it connects to the device and displays the bite sensor. It’ll flash if a touch sensor is pressed (maybe later I might make one of these trigger a new lap or something?).
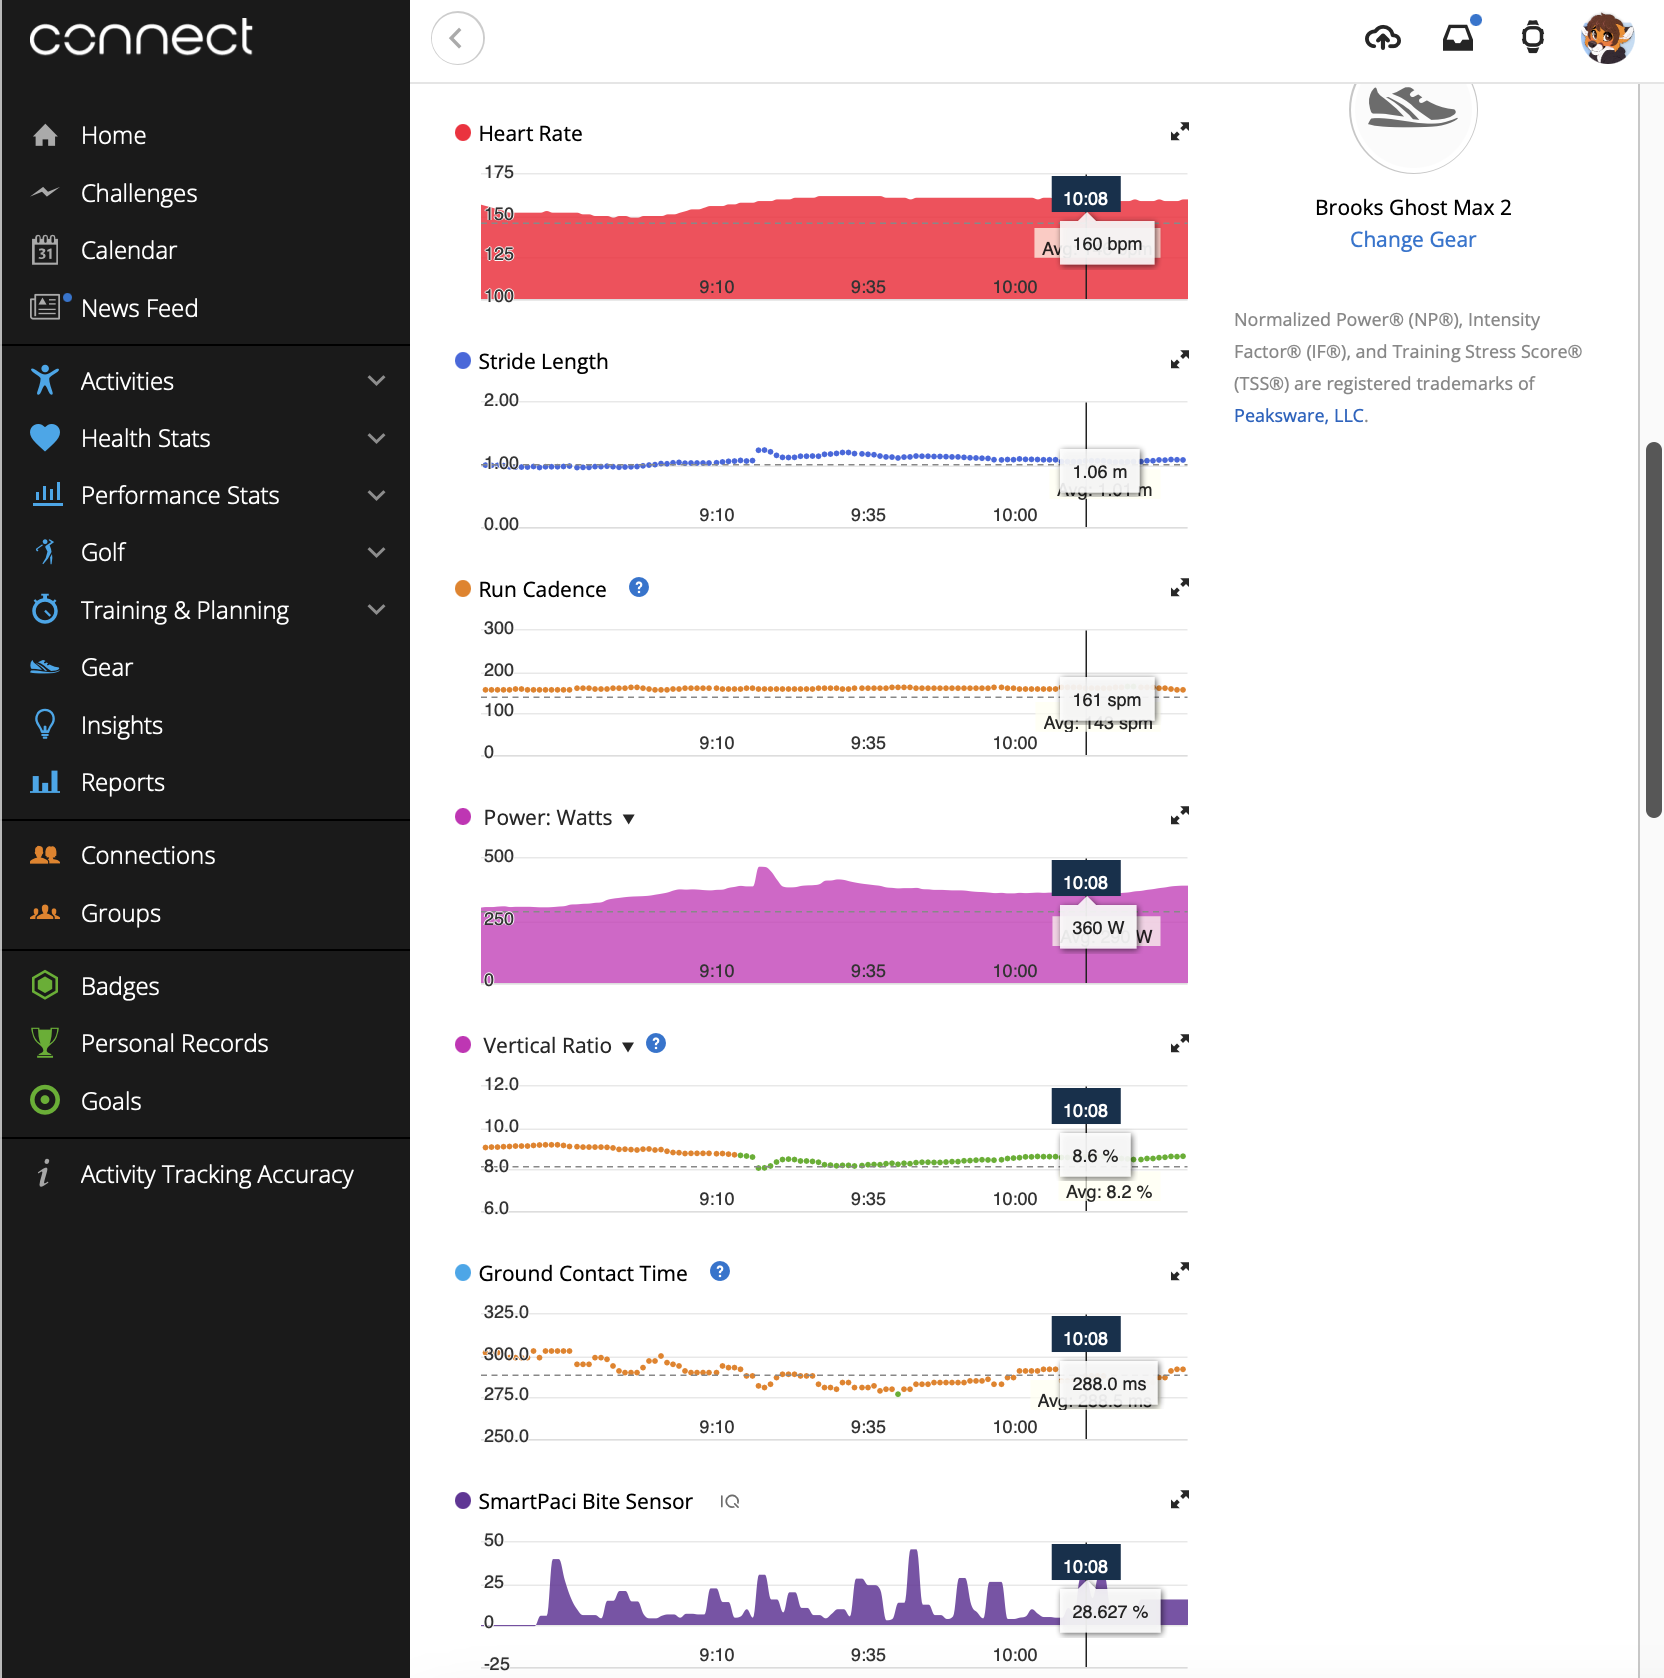
But importantly the data is recorded into the .fit file and when it’s automatically synchronised to Garmin Connect the data is viewable like any other critical stat you find in an activity.
I took the Smart Paci out for a ride and used it for a kilometre long segment. It was surprisingly comfortable while riding. As expected the data field recorded how hard I bit, which I believe is an important metric when your biting down on that steep hill or Strava segment.
It’s certainly not just limited to cycling though and works just as well running.
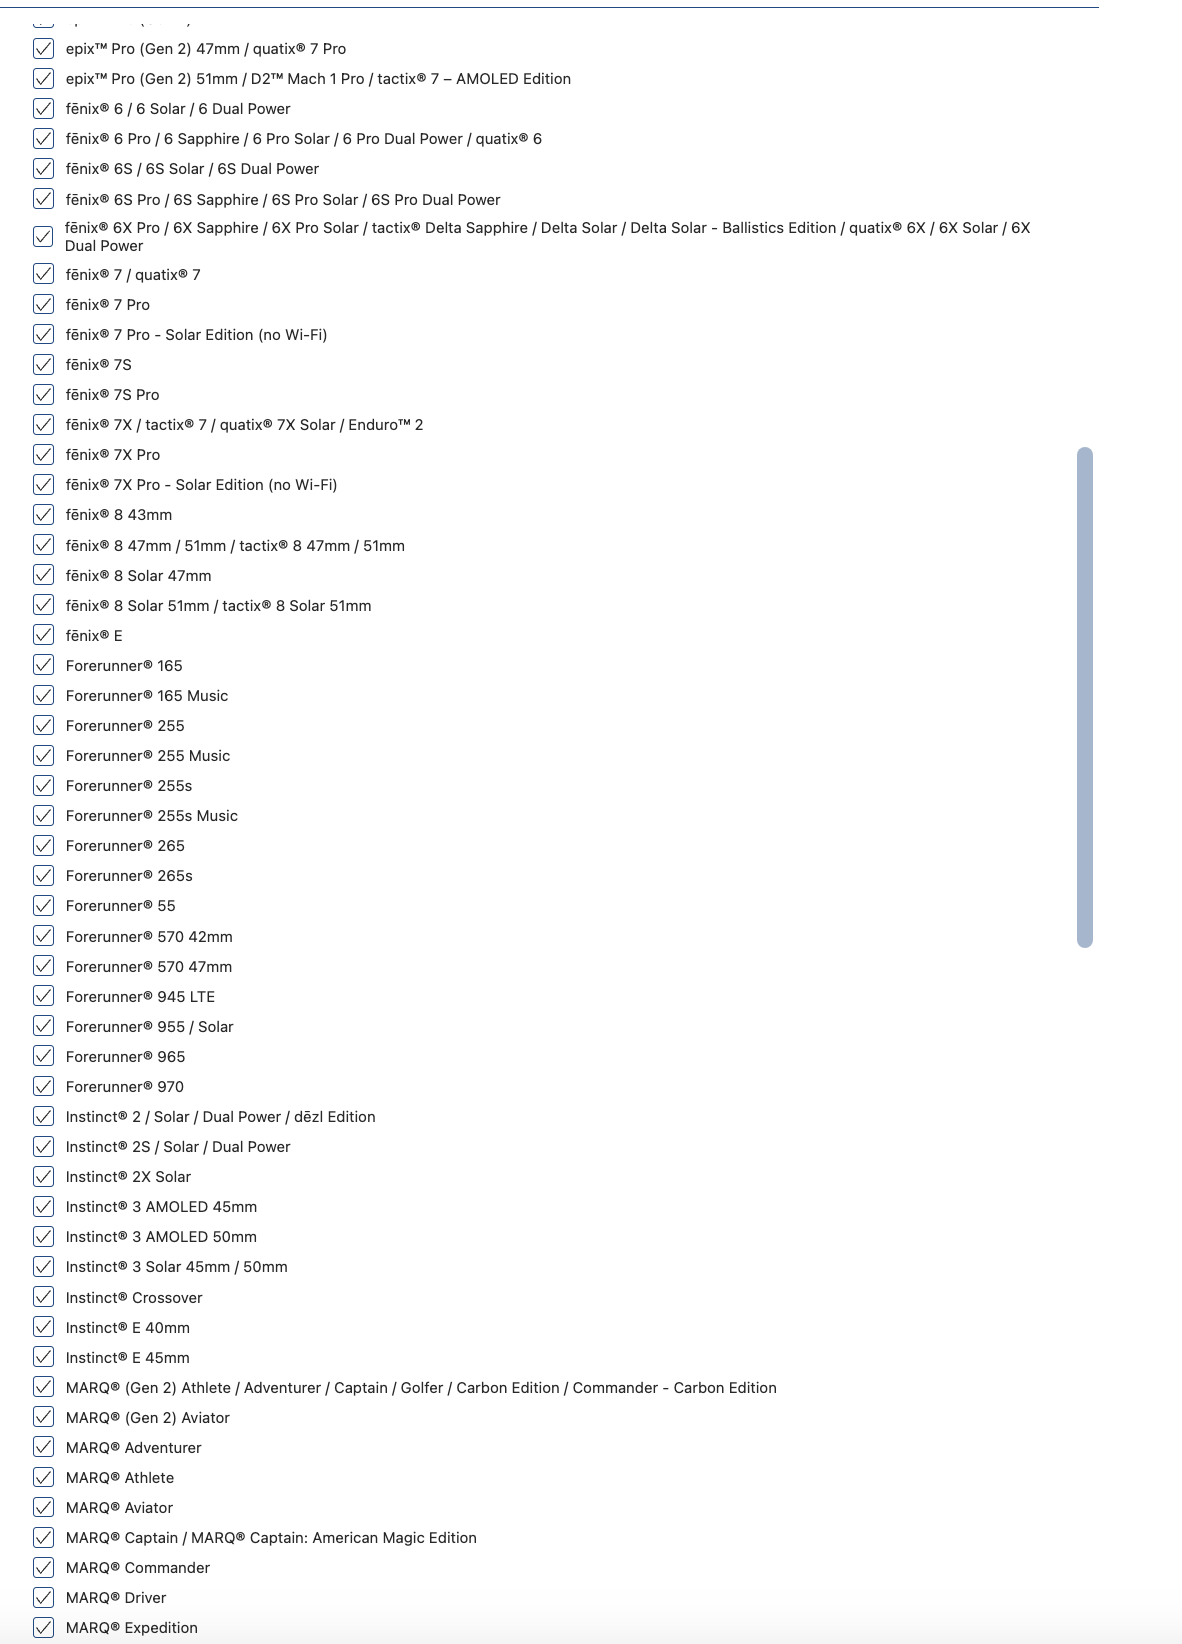
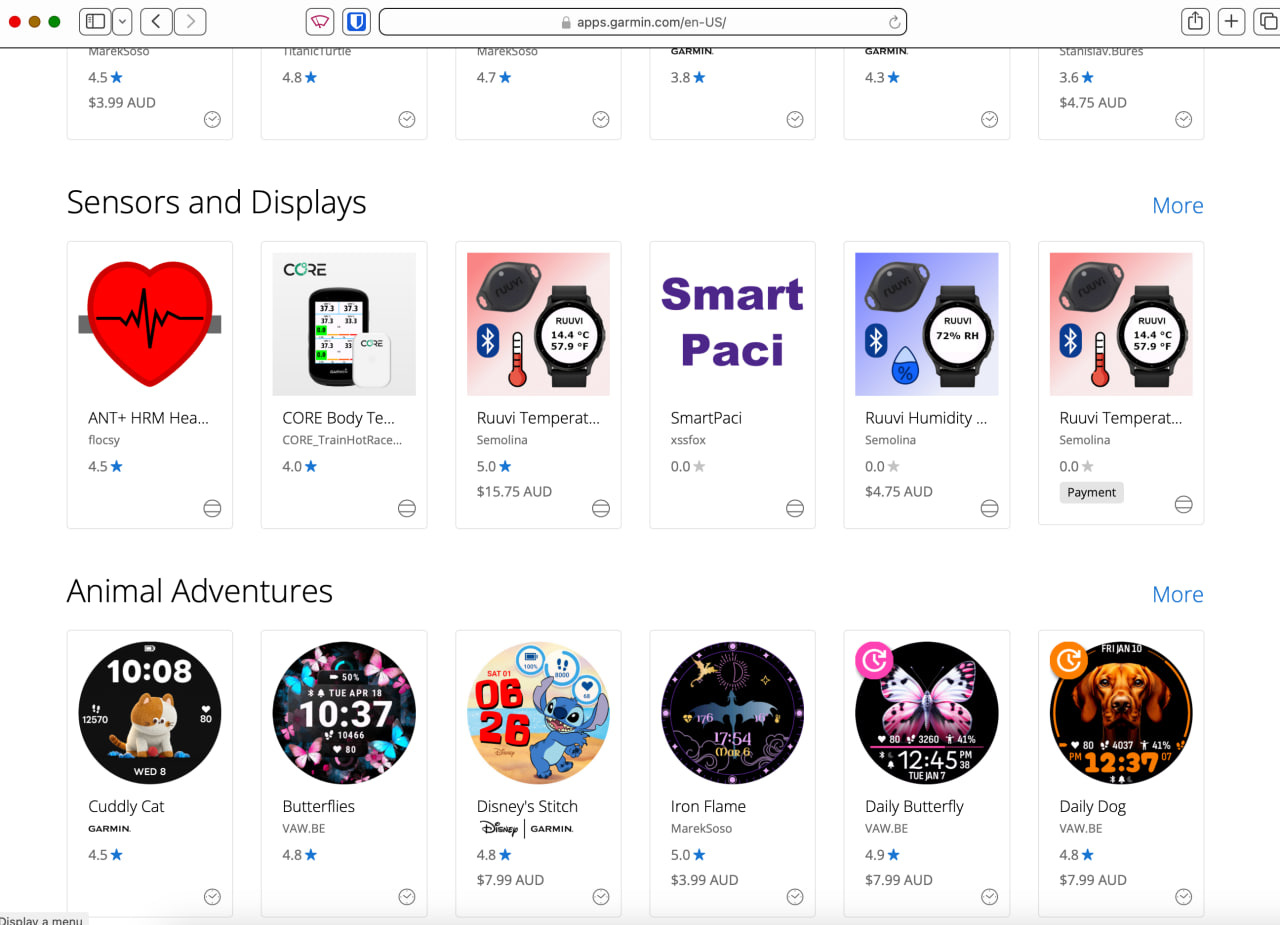
The Connect IQ app/datafield is published on the Garmin App store (and currently features on the homepage…) - however you will need a Smart Paci from Curious Inventions.
Currently it pairs to the first seen Smart Paci, so if you have multiple this might be a headache
My prototype Smart Paci generates a new mac address on boot so the datafield won’t reconnect. For long rides where you might have a coffee break remember to keep the Smart Paci on so the Garmin can reconnect to it
Datafield recording in Garmin doesn’t provide feedback as to when/which value was recorded. This proves a little tricky in deciding what to write to the field and when. At the moment I select the max value roughly once a second. The current Smart Paci firmware seems to only send data when it changes so it’s possible that the resulting “0” value might not get recorded. In practice I don’t think this is a problem as there’s usually a changing value and you can determine on the chart if there’s an actual data point, but it does have the potential to be misleading (you’ll notice a long section of the same value)
Apparently “dummy spit” is an Australianism. It means to have a tantrum / act as a child. A dummy is what we call a pacifier. ↩︎
I am writing today laying on the couch both a little bit sick and with a sore knee (best to double up these things up to save on recovery time right?). This does present me with an opportunity to write about my budget running timing gate project.
At large running, cycling and probably countless other events, participants are usually given a bib containing their name / race number. Inside this bib is a little UHF chip/tag which transmits as it crosses a gate such as the start or finish line. The gates themselves are usually a mat that contain the antenna within. Many races usually contain multiple gates and recently have provided websites to monitor the progress of participants throughout the event.
Prior to messing up my knee, then falling off my bike… again, I regularly took part in a run club near me. The run involves following the river then a short city section back to the start, totalling about 7.5km. It’s a really lovely run with a small group of people. At one point we joked about people cutting one of the corners and that they would be penalised. It got me thinking - could we build a low budget gate system for fun. Even +/- 10 seconds is going to be fine for this.
So when we think about these gates there are three main components, the gate, the tag, and the server/site. I wanted this to be super low budget so for the tag I decided to pick something that we all already had - smart watches. In this case specifically Garmin, however I think this approach could work for others as well. The idea here is to set up the watch to broadcast heart rate over bluetooth. The gate would monitor bluetooth signal strength and record a crossing when the bluetooth signal is strongest.
Some quick tests showed that this approach was possible. The above diagram shows my signal strength (in blue) and in yellow when I pressed the lap button as I cross the gate. Someone else (red) happened to be running at the same and were accidentally included into the experiment - I guess they had heart rate transmitting turned on.
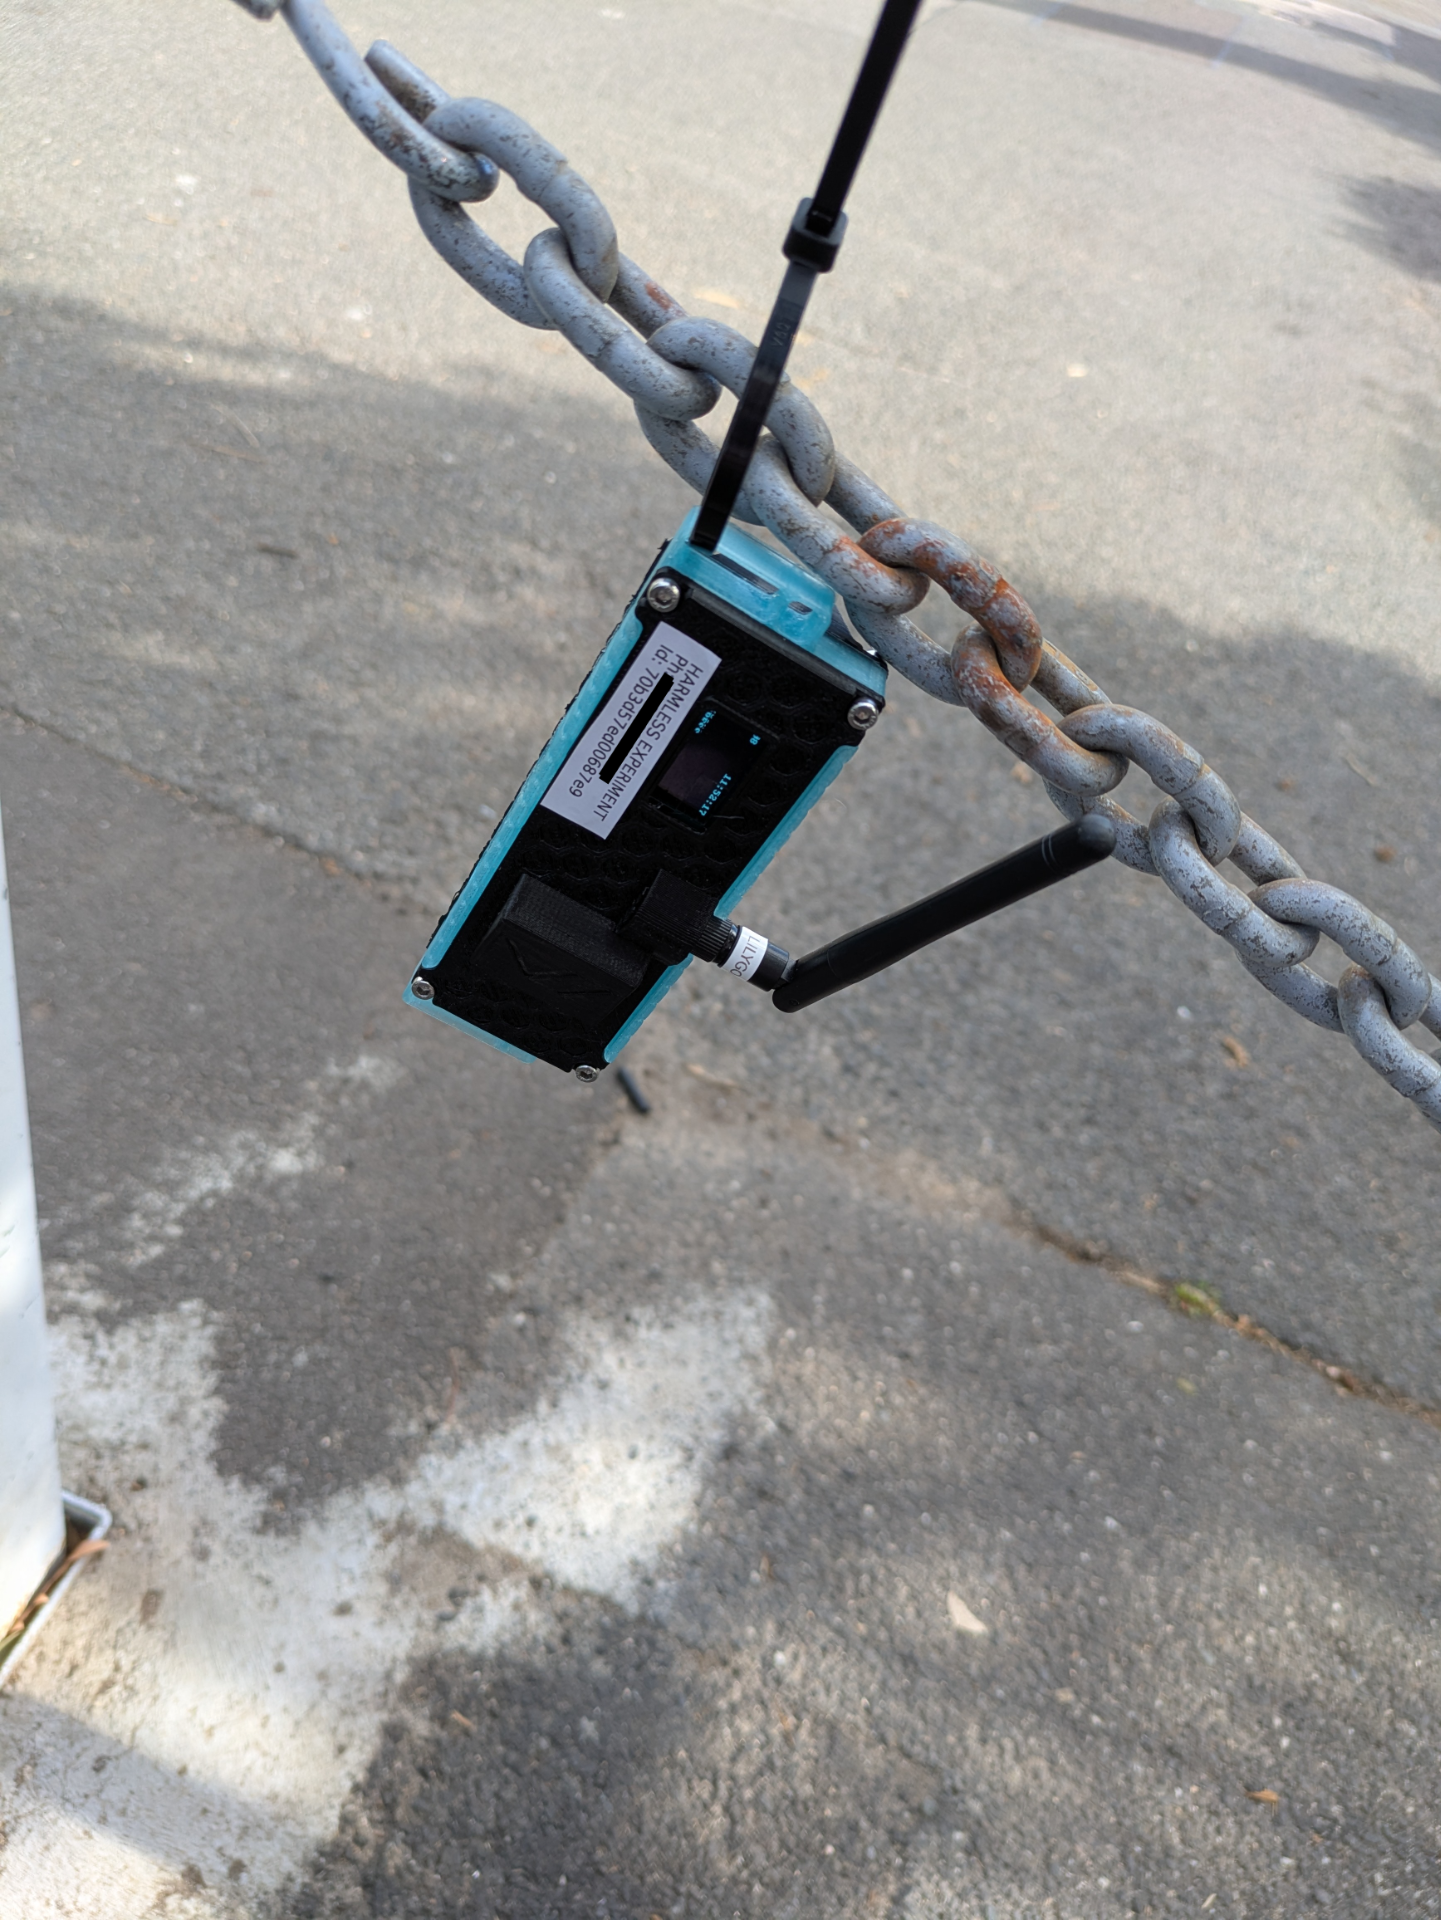
For the gate, the constraints are even harder. It needs to be installed in public space, ideally without asking for permission, not getting in the way (eg no mat), be left unattended (so not expensive if stolen/lost), have some form of live communication. My first idea here was cheap smart phones. However I had concerns about them being stolen and the cost of mobile plans. My next thought was using LoRa WAN devices. Originally I went with a LILYGO TTGO but switched to a T-Beam.
The T-Beam gives me a GPS (good for time!), WiFi/Bluetooth, LoRa transmitter, 18650 battery, and a little display for diagnostics. These are used a lot with Meshtastic folk so there’s also lots of 3d printed case designs as well.
I wasn’t sure if I wanted to hide these or make them look like they belong there.
In terms of communication I’ve been using the “The Things Network”. Likely Helium network would provide more coverage but fuck crypto. As a user crosses through the gate it records the time (this is why GPS was handy) and MAC address. After a waiting period it’ll transmit the seen bluetooth mac address and the time of the strongest signal. The Things Network receives this and triggers a web hook for my API.
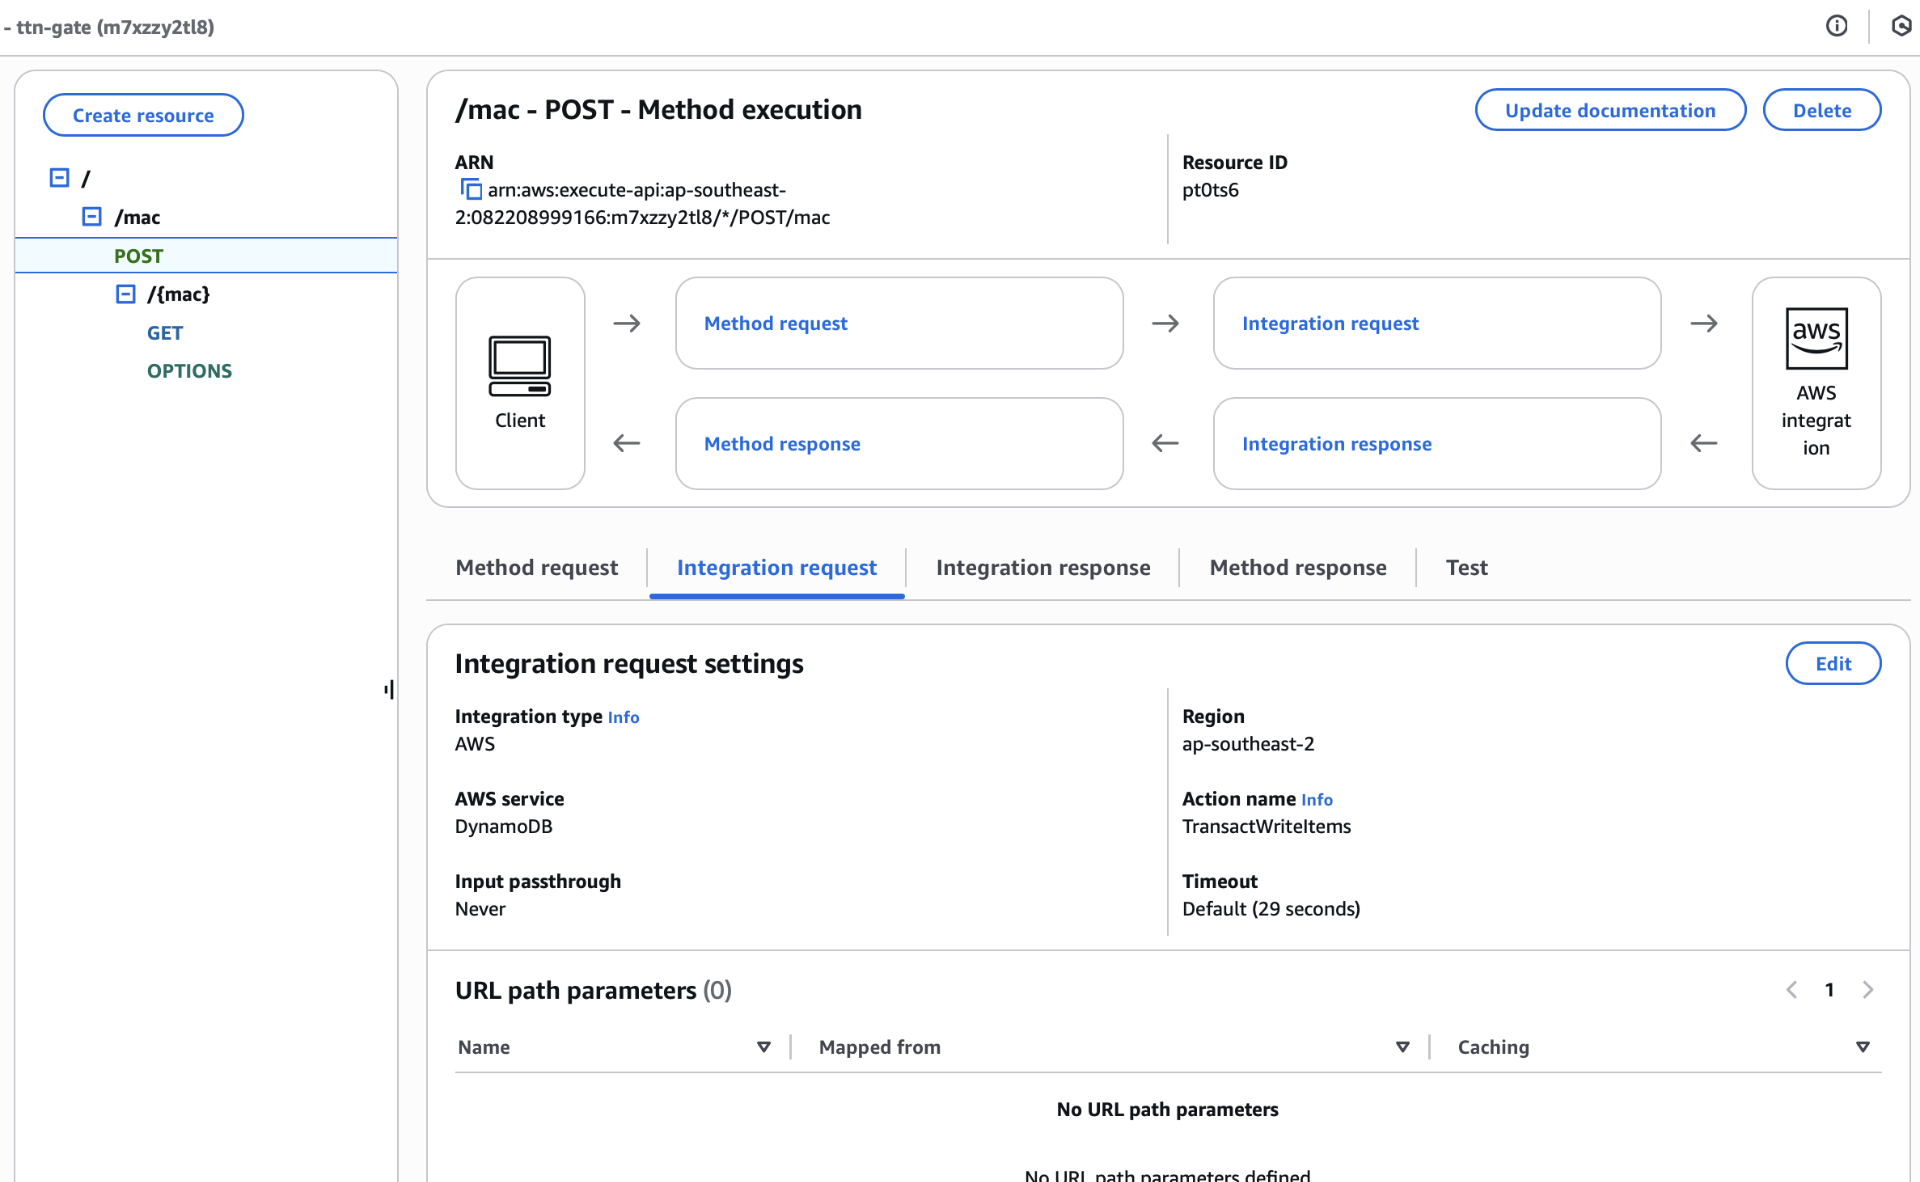
Fun little side note here. My backend API doesn’t have any real code. There’s no Lambda function or container running. It’s just API gateway mapping the request into a DynamoDB request.
Before we get too far I wanted to talk about privacy. This system doesn’t really have an opt-in function - apart from turning bluetooth on or off on your smart watch. Any Garmin MAC address detected will get forwarded over the The Things Network and to my backend. The Things Network is encrypted so other people sniffing around won’t be able to see that data. I’ve had a think about how this might be able to be improved and the best I can do is a sort of registration process, where a user might sign up and register their MAC address with the service ahead of time. Possibly even require them to register at a specific gate. Because this is just a fun little project with friends I haven’t implemented any of that, but I thought it would be worth mentioning if anyone wanted to build this into a bigger system.
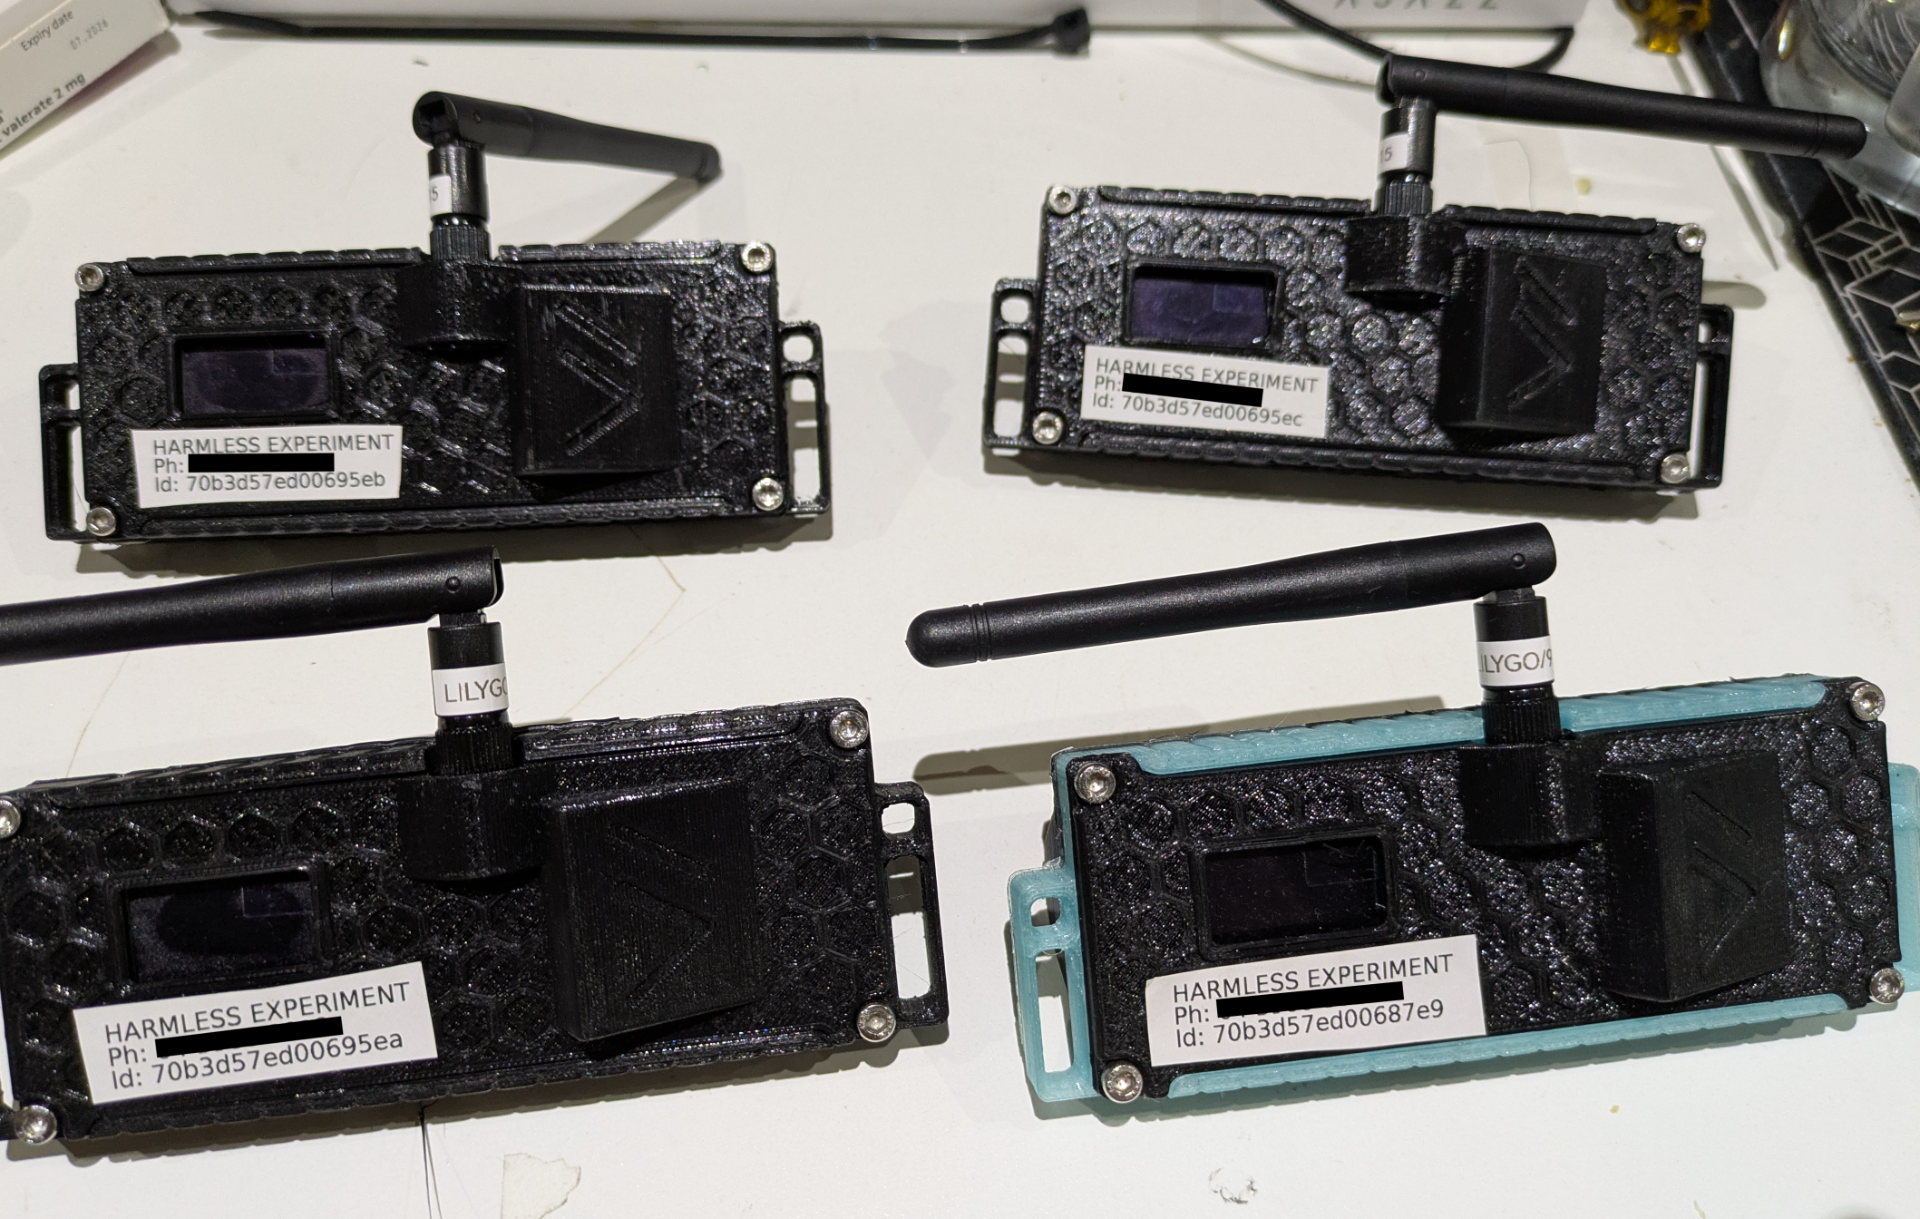
So I built four of these little gates. I think four is sort of the minium you can get away with for this system. You probably need one for the start and unless your start is also the finish you need 1 for the finish. Then you need one fairly close to the start so you have an initial pace estimate (I always wondered why there was a gate really close to the start at Run Melbourne). Which leaves one more for a half way point.
I haven’t had much luck with actually doing practical tests with these, but on the weekend I got the opportunity to. Alex donated her time to help me, and I even did two laps of the test course myself.
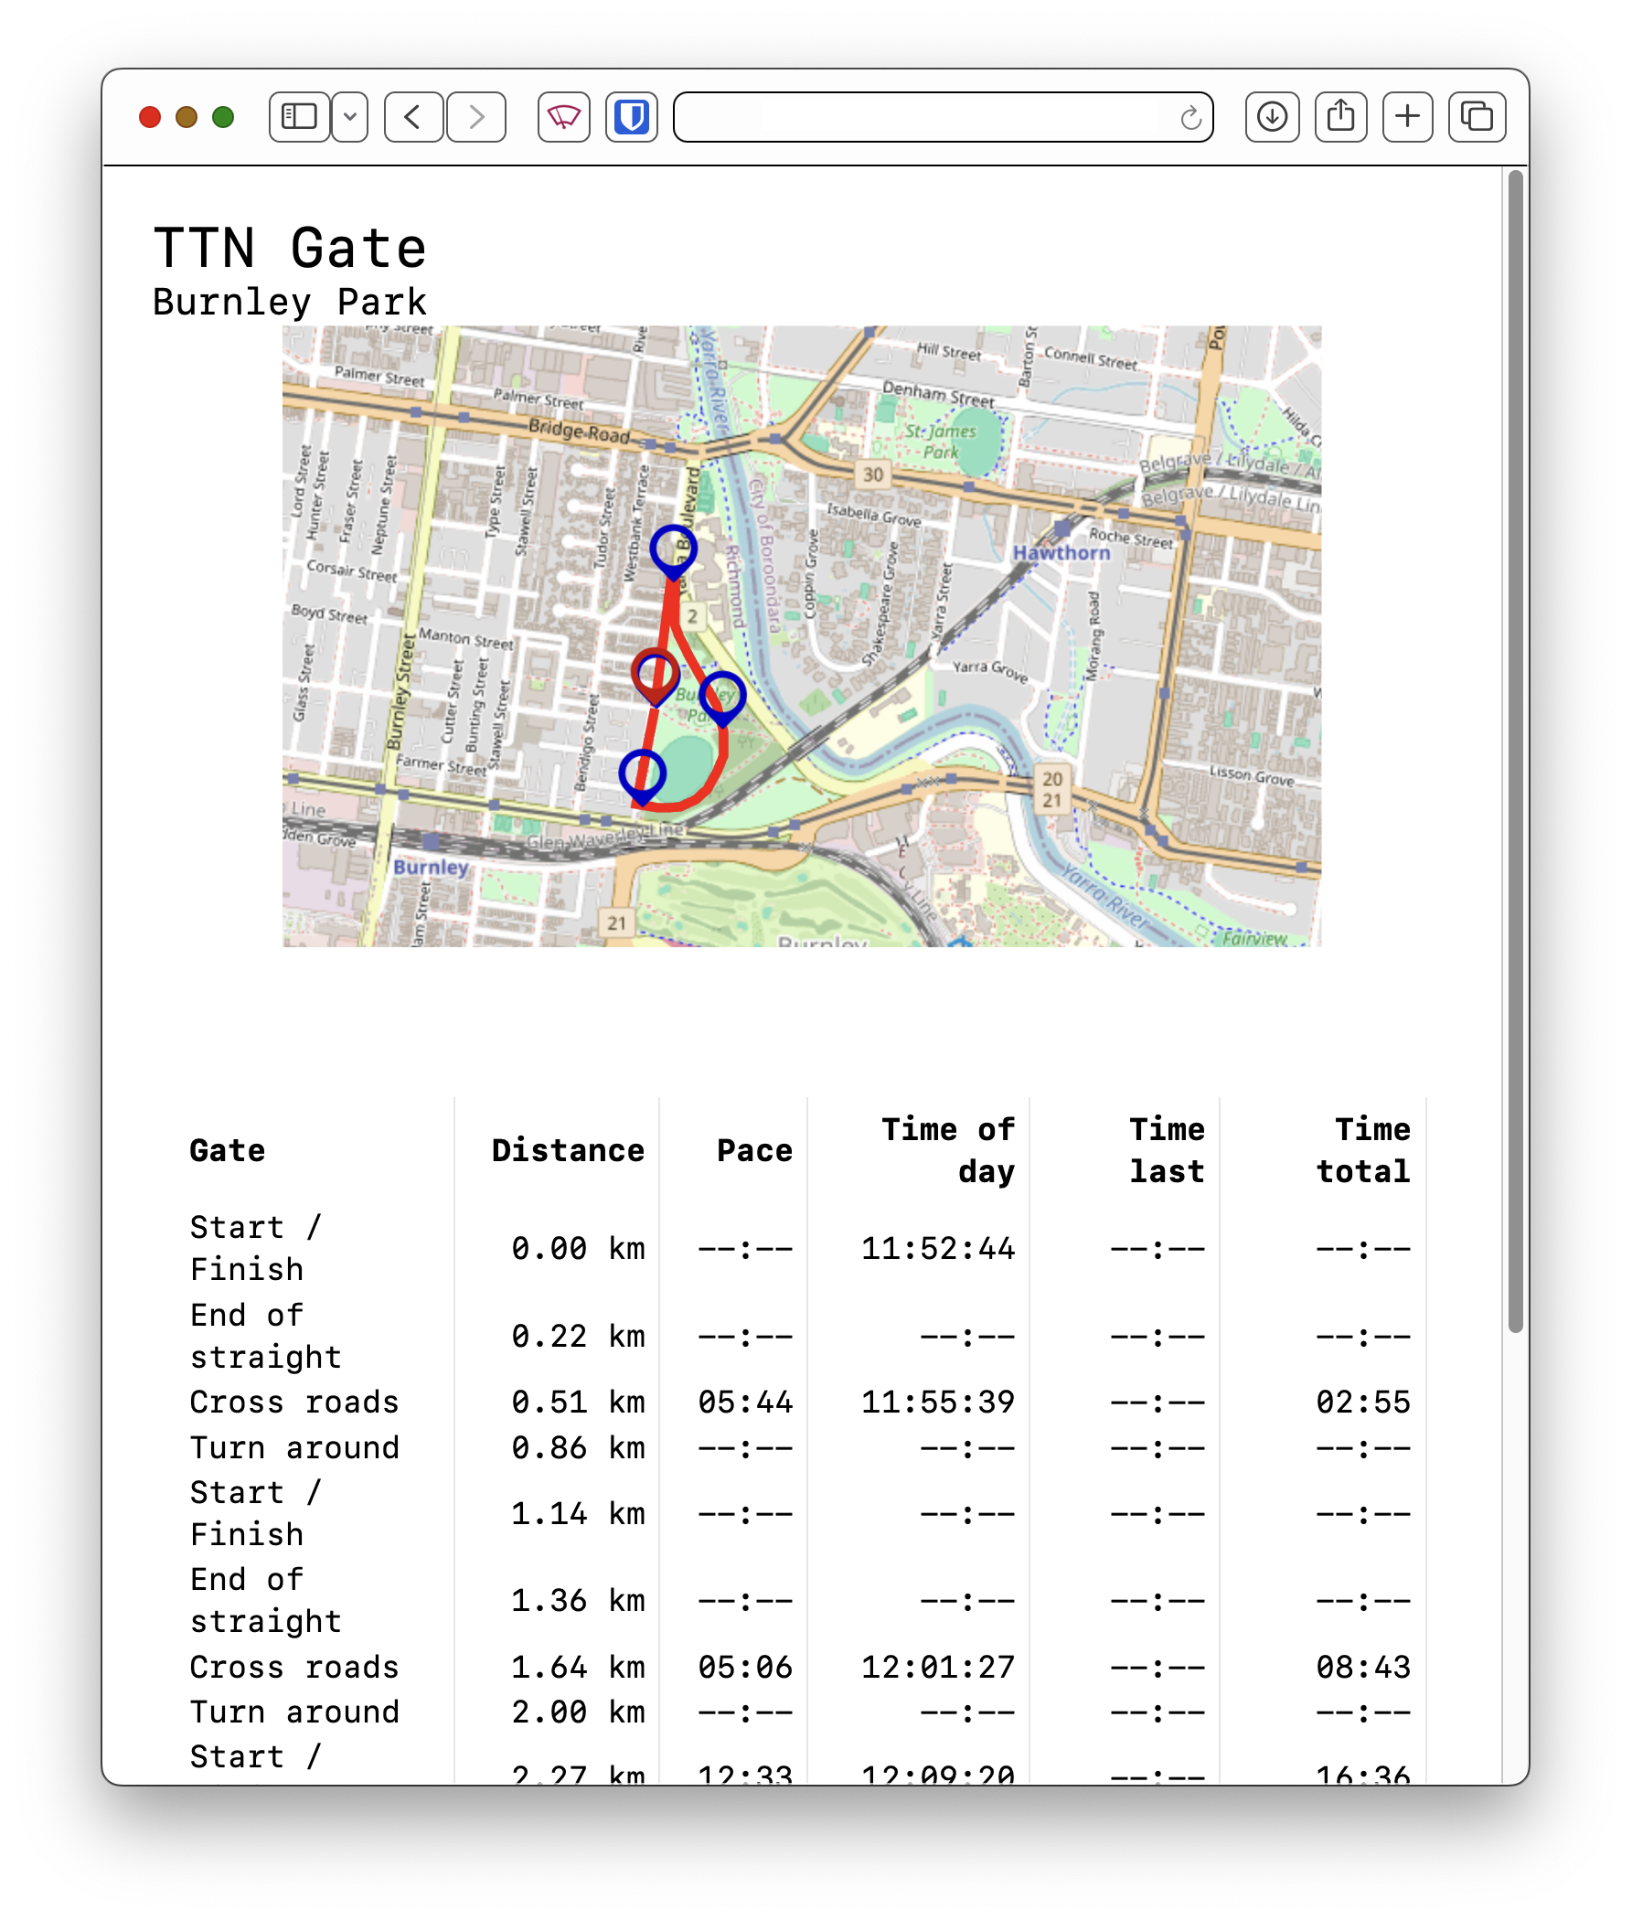
So this is what the website looks like after the run. While running the red marker will indicate estimated runner position and lap times are updated once received. The route is programmed in via a small JSON config file like so:
And a GeoJSON file is used to provide the route for the map.
As you can see the screenshot, a number of gates were missed. One of the gates had a failed battery when we went to do the test so we had to only use 3 gates. One of the gates position didn’t have any The Things Network coverage, so never reported crossings. And just to make things worse, someone parked a car right where the start/finish gate was located. This stress tested the algorithm used for lining up the gate crossings with the route - something that has taken a lot of thinking. Handling missing gate crossings can be a bit tricky to get right.
Even though not many data points were recorded in this test it was still a good outcome showing that the system can work. The coverage issue is somewhat known. I was running a gateway recently but didn’t like the overall setup so I’m in the process of rebuilding it which should improve that specific test track. Looking forward to trying this on a much longer track when I’m up for long runs again.
I usually don’t write blog posts on things I’ve been doing at work, however AWS Backup is just so truly bad I want to warn people of some of the gotchas should you want to perform your own migration to it. Lets start with what AWS Backup thinks it is. (Emphasis by me)
AWS Backup is a fully managed service that centralizes and automates data protection across AWS services and hybrid workloads. It provides core data protection features, ransomware recovery capabilities, and compliance insights and analytics for data protection policies and operations. AWS Backup offers a cost-effective, policy-based service with features that simplify data protection at exabyte scale across your AWS estate.
Now before I tear AWS Backup apart let me start with the parts that I think are good and why you’ll probably use it.
Automated and fairly straight forward copy jobs to other AWS regions and accounts
Very easy to demonstrate to auditors that your backups are happening and working
Can backup resources based on filters - no need to create a job for each resource
Various methods of protecting the backups from tampering
Continuous backup modes*
Cost effective
AWS product page mentions the cost-effectiveness of AWS Backup and this might be partly true depending on how you are currently doing your backups or what resources you are backing up. For example say you had a script that copied from one S3 bucket to another as your backup. In us-east-1 you would pay $0.023 per GB for that backup. Now that same backup using AWS Backup would cost just $0.05 per GB…. wait what. You are paying effectively 2.2 times more than S3 to backup using AWS Backup. What. DocumentDB, RedShift and Aurora are cheaper to backup using AWS Backup than S3. In Sydney region EBS volumes are cheaper to backup than S3. This makes no sense to me.
But wait, there’s more. When you perform the initial backup for S3 (and for changes) AWS Backup performs the requests to S3 like a normal client, this means you get stung with KMS, CloudTrail, S3 requests and GuardDuty api calls. There is no way to filter our AWS Backup from CloudTrail - so if you have have a lot of objects you could get up for thousands of dollars for that initial sync. AWS Backup team solution is to “turn of CloudTrail” or “don’t use AWS Backup”. Amazing. GuardDuty isn’t even listed in the support docs on possible costs.
Now before we leave the cost effectiveness section of this blog we should talk about budgeting. It is impossible to estimate how much AWS Backup will cost. I lodged 2 tickets to get an idea of how continuous backup mode works and how much it would cost to backup RDS and Aurora instances. The responses were both unhelpful and misleading. Copy jobs for Aurora and RDS are only snapshots, not PITR - this is not made clear in the docs. Trying to estimate this cost is near impossible because not even AWS knows how to do this.
Fully managed
There’s a bunch of fundamentals that are just missing from AWS Backup compared to pretty much any other backup solution. For example want to test that a backup plan works correctly? Guess what, you can’t trigger a manual start. You have to wait for the scheduled run time. So you want to get a list of jobs that are not successful - the UI only lets you filter by one state, and there is like 4 different failed states.
But it’s ok because you have useful AWS features like sending SNS notifications when backups fail… except for some reason you can’t send that notification failure SNS to another AWS account for some unknown reason….
Restore testing sounds great. You schedule it to test restores, you can even run your own validation scripts as Lambda functions. However it was clearly a hacked on feature. For S3 you have to restore the entire bucket. Have a large bucket, that’s gonna cost you. For Aurora and DocumentDB the restore test doesn’t even start an instance. It just creates a cluster. What’s being tested? Then to top it all off, S3 buckets linger around for days because to clean up the S3 bucket AWS Backup uses a lifecycle rule to delete all the objects (I know this is a good move for cost effectiveness but that’s an internal AWS thing!).
If you are configuring restore testing, much like backups there’s no way to trigger a test now. Hope your IAM, Lambda function, Event Bridge rules are perfect. Oh btw, since you have create resources for DocumentDB and Aurora - hope you can handle waiting longer than the Lambda timeout to do the test. Restore testing doesn’t even try to restore with the same configuration - so you have to manually define the VPC and SGs for the databases as well - otherwise it will try to use the default VPC and SG.
And how do you define those parameters for setting security group and vpc? As a JSON object? As a string? Nope, a JSON object as a string. There’s no validation on this, so if you send the wrong object, or send an array instead, the UI explodes.
It’s ok, restore testing will clean up your resources once the test is done…. nope if you created instances you need to delete them before it will clean up the cluster.
Simplify data protection
Here’s an incomplete list of gotchas for AWS Backup
Remember to exclude the CloudTrail logging bucket so you don’t make loops
Remember to exclude the server access logging bucket so you don’t make loops
Don’t remove S3 Event Bridge notifications on buckets that have been configured with AWS Backup otherwise the backup has to start again (terraform does this by default when you have a notification policy configured)
If the bucket is empty or not files that will be backed up - the job will be marked as failed
Don’t configure AWS Backup for the same backup window as RDS backup window otherwise backups will branch creating conflicting backups
Can’t create overlapping schedules for continuous backups - so be careful with your resource selection
Restore testing UI doesn’t display what resource it restored either. Just what the restore point ARN is. This makes it hard to demonstrate to an auditor that you tested resourcing of that resource.
Compliance insights
So after all of this you think, at least I have audit frameworks. Except if you are doing restore testing you quickly find out that the restore test resources are included in the report - suggesting you should backup your restores. And there isn’t a good way to exclude them because it’s really just AWS Config in a trench coat.